
 De
De 

-
-
-
-
-
-
-
-
-
-
-
-
-
-
-
-
-
Managing Named Views
-
-
-
-
-
-
-
-
-
-
-
-
-
-
-
-
-
-
-
-
-
-
-
-
-
-
-
-
-
-
Managing Named Views
When you perform a project, you often have to work with different fragments of a document. Navigation commands in the document (zooming and panning) and tools used to switch from model space to paper space and back are often used. You can save fragments of the document which are frequently used as named view. Named views allow you to switch between one part of the document to another.
 Ribbon: View – Views >
  Set View
Menu: View –  Named Views
 Command line: VIEW, -VIEW
Hot keys: Alt+E
The command allows creating, restoring and deleting named views from the model space and paper space.
After the command is started, the prompt of available options is shown in the command line:
Enter an option [?/Delete/Orthographic/Restore/Save/Settings/Window]:
Command options:
|
? |
Displays named views in the document. Option starts the following prompt in the command line: Enter view name(s) to list <*>: Asterisk symbol (*) is set in the angle brackets by default, it means that when you press the ENTER a full list of named views is displayed in the command line: Saved views: View name Space View 1 M View 2 M View 3 M View 4 L View 5 L The M letter means that named view is in the model space and L letter in paper space. |
|
Delete |
Deletes named view. |
|
Orthographic |
Selects standard orthogonal view. The option starts the following prompt in the command line: Enter an option [Top/Bottom/Front/Back/Left/Right] <Top>: Options: Top - Sets top view. Bottom - Sets bottom view. Front - Sets front view. Back - Sets back view. Left - Sets left view. Right - Sets right view. |
|
Restore |
Restores the view (selected view is displayed on the screen). |
|
Save |
Sets a name to the current view, displayed on the screen. |
|
Settings |
Specifies the display properties of restored named view. The option starts the following prompt in the command line: Enter an option [BackGround/Categorize/Layer Snapshot/Live Section/UCS/Visual style]: Options: BackGround – Redefines background for view of model space, which does not have “2D Frame” value of visual style. Categorize – Displays view category, specified in the drawing (for the views of model and layouts). Layer Snapshot – Defines switch on/off parameters of the current view to be saved or not, with the named view (for the views of model and layouts). Live Section – Displays live section used when the view is restored (only for model views) UCS - Defines UCS to be saved or not, with the named view (for the views of model and layouts). Visual style – Defines a visual style to be saved with view (only for model views) |
|
Window |
Creates a new named view by specifying opposite corners of the rectangular area on the screen. |
To save a current view:
Command prompts:
|
Enter an option [?/Delete/Orthographic/Restore/Save/Settings/Window]: |
Select option Save. |
|
Enter view name to save: |
Enter a view name and press ENTER. |
To save several views at once:
Command prompts:
|
Enter an option [?/Delete/Orthographic/Restore/Save/ Settings/Window]: |
Select option Window. |
|
Specify first corner: |
Specify first corner of the rectangular area of the first view. |
|
Specify opposite corner: |
Specify opposite corner of the rectangular area of the first view. |
|
Enter view name to save: |
Enter a name of the first view and press ENTER. |
|
Specify first corner: |
Specify first corner of the rectangular area of the second view. |
|
Specify opposite corner: |
Specify opposite corner of the rectangular area of the second view. |
|
Enter view name to save: |
Enter a name of the second view and press ENTER. |
|
Specify first corner: |
Specify first corner of the rectangular area of the following view or press ESC to finish the command. |
note: After the view name is specified the image is autopanned to display a created named view on the screen.
To restore (display on the screen) a named view:
Command prompts:
|
Enter an option [?/Delete/Orthographic/Restore/Save/Settings/Window]: |
Select an option Restore. |
|
Enter view name to restore: |
Enter a name of the view. |
To switch quickly between the view use the  button at the end of the layouts tab bar. Click on it and the context menu displaying all existing layouts tabs and named views in the document is shown:
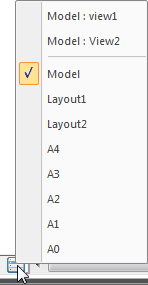
There are named views in the top part of the menu and layout tabs in the bottom part. Named views of the model are marked with Model: prefix, named views of the layout are marked with a prefix of the corresponding layout’s name (Layout1:, Layout2:, A4: etc.). The current tab is marked with  sign. Click on the corresponding menu item to switch to the required named view.
To delete a named view:
Command prompts:
|
Enter an option [?/Delete/Orthographic/Restore/Save/Settings/Window]: |
Select an option Delete. |
|
Enter view name(s) to delete or [view1/view 2/ view 3/view 4]: |
Select a view name to be deleted. The selected view name is deleted from the list of named views just after you click. |
|
Enter view name(s) to delete or [view1/view 2/view 4]: |
Select the name of the following view to be deleted or press ESC to finish the command. |