
 De
De  Es
Es  Fr
Fr 

-
-
-
-
-
-
-
-
-
-
-
-
-
-
-
-
-
-
-
-
-
-
-
-
New Image from Selection
-
-
-
-
-
-
-
-
-
-
-
-
-
-
-
-
-
-
-
-
-
-
-
-
-
-
-
-
-
-
-
-
-
New Image from Selection
Create New Image and Rasterize Objects
 Ribbon: Raster – File >
  New Image from selection
Menu: Raster – New Image from Selection
 Toolbar: Raster –
 Command line: NEWRASTERFROMSELECTION
Selection for new image can contains:
· raster images;
· vector objects.
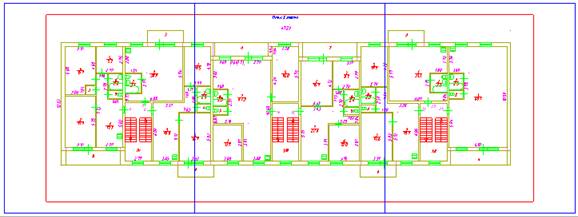
When there is no selection, the operation will apply to all data in the current workspace.
When you select vector data, they are rasterized. Color of rasterized objects depends on color of the resulting raster image:
· Monochrome images - rasterized objects will have color of monochrome image.
· Color Image - rasterized objects will have original color.
How to create new image from selection
1. Select objects and run New Image from Selection command;
2. Set options in New Image from Selection dialog.
3. Click OK.
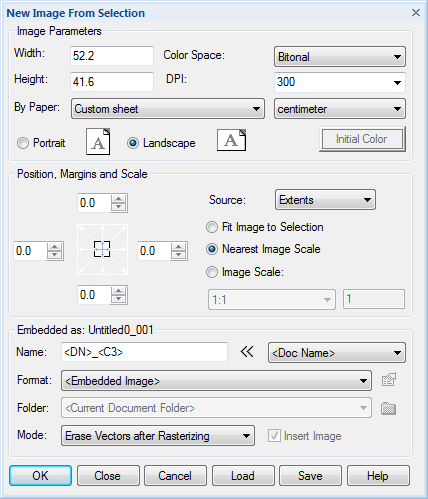
New Image from Selected dialog settings:
Image Parameters
|
Option |
Description |
|
Width Height |
Specify width and height for the new image. |
|
By Paper |
Select from the list of standard paper sizes. |
|
Color Space: |
Specify color space – monochrome, grayscale, indexed or TrueColor. By default, the type with the highest color depth is suggested. If you have monochrome and color raster data, set the type to match the color raster. |
|
DPI |
Set resolution in DPI (dots per inch). |
|
Portrait Landscape |
Select orientation. |
|
Initial color |
Choose background color for color images. |
If your selection contains raster images it’s better to set Resolution and Color Space not lower than best raster image to avoid quality reduction. For example, if you have raster grayscale raster image with 300 dpi, you should set Grayscale or TrueColor, and Resolution not lower than 300 dpi.
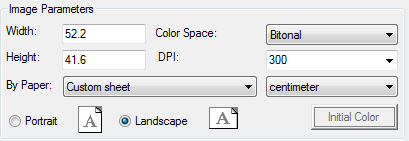
Source
Select objects/area for rasterization:
|
Option |
Description |
|
Extents |
Rasterizes all objects in the drawing’s current space. |
|
Selection |
Rasterizes preselected objects. |
|
Display |
Rasterizes the current view of the graphic area. |
|
Window |
Selection of rasterized area with a rectangular. The area request is initiated immediately after selecting the Window option from the drop-down list. To redefine the rasterization area, use |
 button.
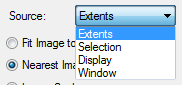
Position, Margins and Scale
The image scale is set by selecting the desired position:
|
Option |
Description |
|
|
Fit Image to Selection |
Select scale to fit all objects to single image. |
|
|
Nearest Image Scale |
Select nearest standard scale to fit all objects to single image. |
|
|
Image Scale |
Set scale manually or from list |
|
|
Using Image Scale, you can create more than one image with specified scale.
In this case files will be created with order number. In this case, the results will be saved to separate files with adding page numbers to the set name:
|
||
|
|
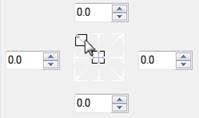
Set margins and image position. Positions the image relative to the sides of the fixed aspect. Enter indentation values in the section fields corresponding to the image sides. If the image fits into one page of the current format, you can set alignment to one of the sides by left-click on the arrow with the desired alignment type
|
|
Embed or save as
Settings for saving the resulting image.
|
Option |
Description |
|
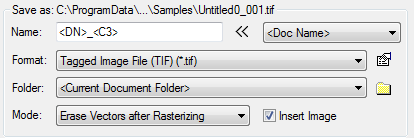
Name |
Specify name for the image It can be done manually or using macros. When naming, you can use the macro definition in the name mask, either by entering it manually or by selecting a value from the list in the right field: · Select variable, press Macro definitions from the list are always added to the end of the mask (but you can transfer them manually). When naming, they are replaced with their corresponding value. A sample full name is displayed at the top of the section.
|
|
Format |
Select format for raster file: Embedded TIF, TIFF, BMP, JPG, JPEG, PNG, PCX, GIF. For some formats, additional options are available by |
|
Folder |
Specify folder for raster image file. If Current document folder is selected – image will be saved to the same folder where drawing is stored. This option is unavailable, if the <Embedded Image> value was selected in the Format drop-down list. |
|
Mode
|
Action with selected object after rasterization: · Keep Vectors after Rasterizing; · Erase Vectors after Rasterizing. |
|
Insert Image |
Checking this box allows you to immediately insert the created raster image saved in a separate file into the original document. If the checkbox is not checked, only the raster image is saved to the specified folder, without inserting a link to it. The checkbox is unavailable if the <Embedded Image> value was selected in the Format drop-down list |
 button.
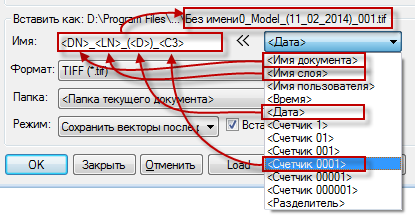
 button.
Finish your work
Buttons.

|
Button |
Function |
|
OK |
Creates raster image. All dialog settings will be saved. |
|
Close |
Closes the dialog with saving all dialog settings. Raster will be not created. |
|
Cancel |
Closes dialog without changes. |
|
Load |
Loads the dialog settings from the template file .tpl. |
|
Save |
Saves the dialog settings to template file .tpl. |
|
Help |
Opens Help. |