
 De
De  Es
Es  Fr
Fr 

-
-
-
-
-
-
-
-
-
-
-
-
-
-
-
-
-
-
-
-
-
-
-
-
-
-
-
-
-
-
Texture Editor
-
-
-
-
-
-
-
-
-
-
-
-
-
-
-
-
-
-
-
Texture Editor
The texture editor allows you to configure texture parameters for the edited covering: position it on the surface of an object, specify scaling and repetition parameters, and the method of applying it to the object. Changes you make to the parameters are displayed in the preview area of the Texture Editor.
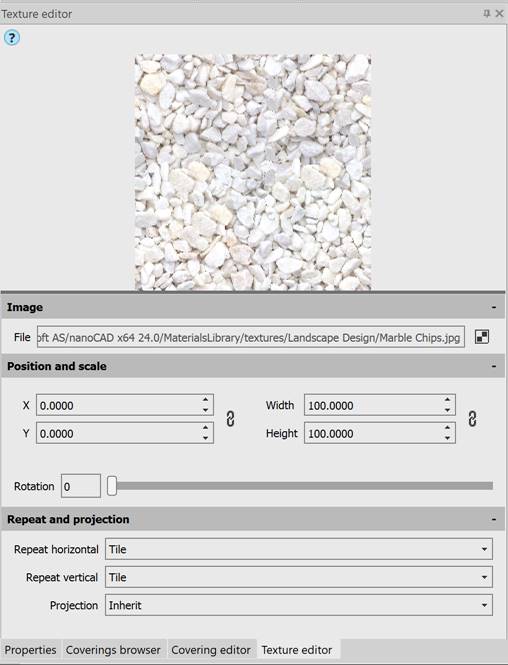
Image
|
File |
Displays the path where the raster texture file is located. |
|
|
Selects a new texture file. |

Position and scale
|
X Y |
Offset of the base point of the texture along the X and Y axis.
|
|
Width Height |
Image dimensions in width and height.
|
|
Rotation |
Specifies the raster rotation angle by entering value into the field or indicating by the slider (from 0 to 360). |
 – button for synchronizing horizontal and vertical offset.
Repeat and projection
|
Repeat horizontal Repeat vertical |
Selects the pattern for filling the surface with texture horizontally and vertically: Clamp, Crop, Inherit, Mirror, Tile. |
|
Projection |
The method of projecting texture onto a surface. An option that allows you to best select the texture overlay depending on the object’s shape: Box, Cylinder, Inherit, Planar, Sphere. |
To create a new covering:
1. Open the Coverings Browser functional bar (COVERINGBROWSER).
2. On the toolbar, click the  New Covering button. To create a covering based on an existing one, right-click on it and select the Clone command in the context menu.
3. If necessary, rename the created covering by right-clicking on it and selecting the Rename command in the context menu.
4. To go to the Covering Editor, right-click on the created texture and select the Edit… command in the context menu.
5. In the Covering Editor toolbar, set the necessary covering parameters, monitoring the result in the preview window.
6. To set the texture, click the  Image… button and specify the path to the image texture file.
7. By clicking the  button, go to the Texture editor toolbar and edit the necessary texture parameters.
To apply the covering:
1. Select objects in the drawing. To select the face of an object, use CTRL.
2. Select a covering in the bar and click the  Apply the selected covering to the selected object in the drawing button.
Or right-click on the covering and select the Apply to selected command in the context menu.
Or apply the covering by double-clicking the left mouse button on the covering.
To delete the covering:
1. Select one or more coverings in the Coverings Browser toolbar (COVERINGBROWSER).
2. In the toolbar, click the  Delete selected coverings button.
3. To delete all unused coverings (except for the Global covering), click the  Delete cerated coverings button in the bar.
4. Coverings applied to the drawing are not deleted from the Coverings Browser.