De
De  Es
Es  Fr
Fr 

-
-
-
-
-
-
-
-
-
-
-
-
-
-
Object Snap Mode
-
-
-
-
-
-
-
-
-
-
-
-
-
-
-
-
-
-
-
-
-
-
-
-
-
-
-
-
-
-
-
-
-
-
-
-
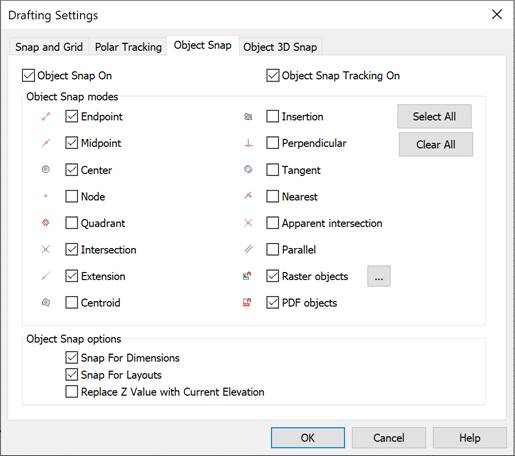
Object Snap Mode
 Menu: Tools –
  Drafting settings… Object snap tab
Status bar: the  button
 Hotkeys: F3
Command line: DDRMODES, DSETTINGS, SE
Object snap is the main and the quickest way to specify an object’s characteristic points without knowing their coordinates.
Characteristic points include:
· End points and the middle of a line,
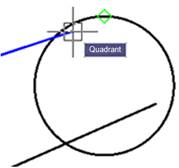
· Center of a circle and its intersection points with center lines (quadrant),
· Endpoints, center and middle of an arc,
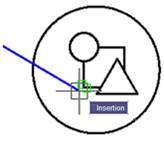
· Insertion point of block or text
· and others.
·
The mechanism of object snap allows one of the characteristic points of the existing object to be specified as the coordinates for the point of a new object.
Object snap can be used when you need to set a point in the command line.
To use object snap:
1. Switch on permanent object snap in the Drafting Settings dialog box, select the Object Snap On check box and select the required mode:
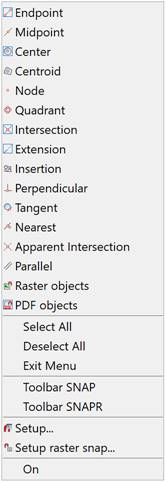
2. Switch on permanent object snap, open the context menu of the OSNAP button in the status bar and select the required mode:
You can also enable or disable object snap modes in the Object toolbar:

It is possible to simultaneously turn on all or several object snap modes at once (except for the context menu of a single object snap – you can select only one mode in it).
The Select All and Deselect All options are applied to all snap modes at once.
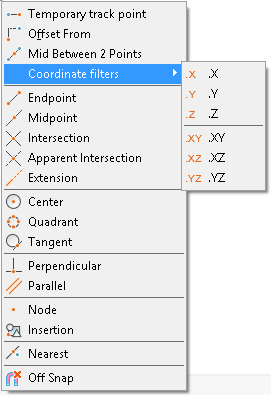
3. Switch on one-time object snap during one of the creation or modifying commands, open the context menu of one-time object snap with CTRL (or SHIFT) button pressed and select the required mode:
You can switch on one or several modes of object snap (except the context menu of one-time object snap, only one mode can be selected there).
The Select All and Deselect All are applied to all parameters of the snap.
One-time object snap is used to replace permanent object snap and stays active until the current snapping is finished. When a snap point is selected, one-time object snap switches off. For example, when creating geometric objects consisting of lines, as a temporary snap you can specify Endpoint, Midpoint, Perpendicular and Intersection. If you want to snap one of the lines to a circle, specify one-time object snap, Center, Quadrant or Tangent.
It is convenient to enable one-time object snap modes from the Snap by request toolbar:

You can also use keywords to invoke a one-time object snap. To do this, when requesting a point, enter the keyword of the corresponding snap and press Enter.
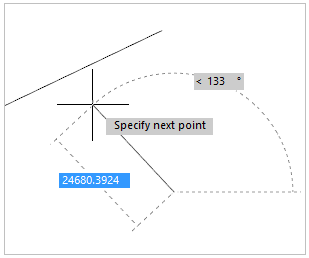
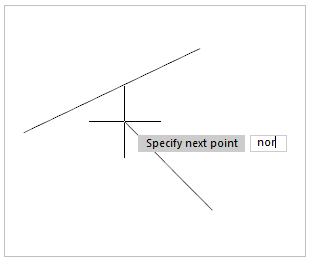

The list of keywords to activate a one-time object snap is given in the table below.
|
Keyword |
Snap type |
|
TT |
Tracking point |
|
FROM |
From |
|
M2P |
Mid between two points |
|
END |
Endpoint |
|
MID |
Middle |
|
INT |
Intersect |
|
APP |
Apparent intersection |
|
EXT |
Line extension |
|
CEN |
Center |
|
GCE |
Centroid |
|
QUAD |
Quadrant |
|
TAN |
Tangent |
|
PERP |
Perpendicular |
|
PAR |
Parallel |
|
INS |
Insertion point |
|
NODE |
Node |
|
NEAR |
Nearest |
|
NONE |
Disabling object snap |
You can cancel the snap by request by pressing the button again, and you will return to the current (working) set of object snaps.
The context menu of one-time object snap has an additional option –  None, which switches off all modes of object snap before finishing the point selection operation. None is used for one-time application (during one operation), that is why it is absent in the Object Snap tab in the Drafting Setting and in the context menu of OSNAP button.
None is used when you cannot select a point in the drawing due to temporary snap modes being used. After the point is specified, the temporary snap mode starts again.
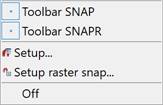
You can switch the object snap mode on/off in the Snap toolbar:

To open the Snap toolbar select the Snap option in the context menu of the OSNAP button:
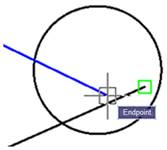
If an object snap mode is switched on, the marker and a tooltip about the available object snap types for the object are shown when moving the cursor over the object. The marker size, color, and presence of a tooltip can be changed in the Snap Settings section of the OPTIONS dialog.
If several or all types of object snap are switched on as a permanent snap, and if a snap to some characteristic point is available in the cursor’s current position (for example, if some objects are placed close to each other), the highest priority snap is used.
The priority of snaps is specified in the Object Snap tab in the Drafting Setting, the highest priority has Endpoint, the lowest – Parallel. Any one-time snap has a higher priority than any permanentsnap has.
Object Snap types:
|
|
Endpoint
|
Snap to the object’s endpoints (lines, arcs etc.).
|
|
|
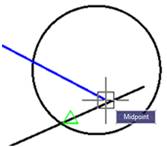
Midpoint |
Snap to the middle of objects (lines, arcs etc.).
|
|
|
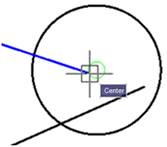
Center |
Snap to the center of an circle, arc or ellipse.
To perform snap: · Place the cursor over the object. The “+” marker appears in the center of the object. · Place the cursor in the center of the object. · When the marker is snapped, click. |
|
|
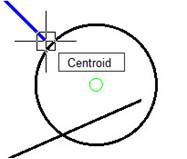
Centroid |
Snap to the center of mass of closed objects (circle, ellipse, polyline, spline, region, block).
|
|
|
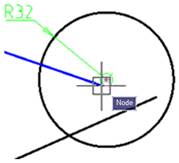
Node |
Snap to a Point of the object, specifying point of dimension or start point of dimension text.
|
|
|
Quadrant |
Snap to the nearest quadrant (the point located at an angle of 0, 90, 180 or 270 degrees from center) of arc, circle or ellipse.
|
|
|
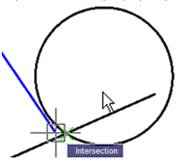
Intersection |
Snap to the intersections of objects (lines, circles, arcs etc).
|
|
|
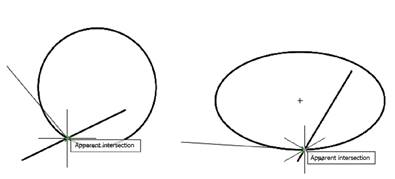
Apparent intersection |
Snap to the apparent intersection of objects. For example, objects (circle and segment) are at different heights and do not intersect. The Apparent Intersection snap will be displayed depending on the orientation of the model (view).
|
|
|
Insertion
|
Snap to an insertion point of text, block, shape or attribute. |
|
|
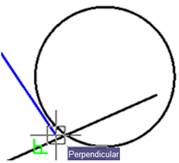
Perpendicular
|
Snap to the point of the object lying perpendicular to another object or to its imaginary extension.
|
|
|
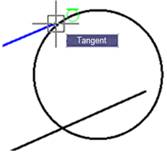
Tangent
|
Snap to the point on an arc or circle belonging to the tangent of another object.
|
|
|
Nearest |
Snap to the point of the object located closest to the cursor position.
|
|
|
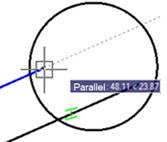
Parallel
|
Snap to an existing linear segment for the creation of a parallel linear segment of another object. After specifying the first point of a linear segment, you need to place the cursor’s over a linear segment of the existing object and slowly move the cursor to the expected position of a parallel segment of a new object. The symbol of a parallel snap on the existing object and parallel rubber line to this object means that you can specify the second point of the linear segment at any required place in the rubber line.
|
|
|
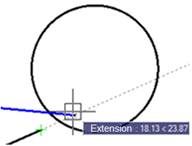
Extension |
Creates a temporary auxiliary line which is an extension of an object and the cursor goes over its end point.
|
|
|
Offset from |
Snap to point which offset by a specified distance from temporary control point. 1. Specify temporary control point. 2. Specify the offset by relative point or by direct-distance method. |
|
|
Middle between 2 Points |
Snap to middle point between two specified points.
|
|
|
Coordinate filters |
Coordinate filters allow you to input the coordinates of a point for each axis separately, specifying coordinates first along one axis, then along another. You can enter the following filters: .x, .y, .z, .xy, .xz or .yz. |


 Raster objects mode ensures object snap to characteristic points of inserted raster image objects.
 PDF object mode allows the object snap to PDF underlay objects as to vector objects.
Object Snap Settings
Snap to Dimensions
Enables/Disables snapping to intersections of dimension and extension lines.
Snap for Layouts
Enables/Disables snapping to the borders and center of the layout.
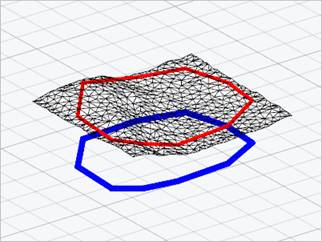
Replace the Z value with the current level value
Manages the Z coordinate value for object snap.
When the option is disabled, the Z coordinate value of the specified point is used.
When the option is enabled, the value of the Z coordinate is replaced by the value of its projection onto the XY plane of the current UCS or, if the ELEVATION variable is set to a non-zero value, to a plane parallel to the XY plane at the specified level. The option is synchronized with the OSNAPZ variable.
Below there are two 3D polylines constructed with snap to the vertices of the mesh. Red – in normal snapping mode, blue – when the Z-coordinate replacement option is enabled: