-
-
-
-
-
-
-
-
-
-
-
-
-
-
-
-
-
-
-
-
-
-
-
-
-
-
-
-
-
-
-
-
-
-
-
Train OCR
-
-
-
-
-
-
-
-
-
-
-
-
-
-
-
-
-
-
-
-
-
-
-
-
-
Train OCR
 Ribbon: Raster – Conversion >
  Train OCR
 Menu: Raster – Convert >
  Train OCR…
 Command line: OCRTRAIN
 This functionality is available only in the Raster module
The standard capacities of OCR module allow to recognize English letters, digits, punctuation marks and special characters (the first half of the ASCII table).
The OCR module can be trained to recognize any character. To do this, either replenish one of the existing libraries with new letter patterns, or create your own library.
The training process creates the examples (topological model) of text characters and place them in an open letter patterns library. Several patterns can correspond to one text character. Character patterns are stored in special letter pattern file libraries. These files are located in the OCR folder by default. You can replace any patterns in the existing library with your own.
Letter pattern library
Run the Train OCR command.
In the Train OCR dialog box:
To create a new pattern library, click  New button or to add new patterns in the existing library, click
  Open button, select the required library file in the dialog box and click OK.
Create new, replace or delete patterns of existing symbols.
Save the library in its own or a new file using the Save button.
Click OK.

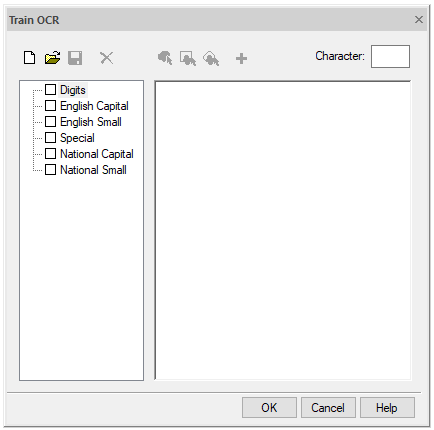
Train OCR dialog box
Creation, replacement and deletion of patterns in the library is performed using the buttons of the dialog box toolbar and the Character input field.


 - tools to pick a raster character.

 - Add and Delete buttons.
Creating a new letter pattern
Enter the required letter in the Character field.
Using one of the selection tools, pick the raster character corresponding to the specified letter:
·  Select character by floodfill. To select, point with the cursor to an isolated raster character;
·  Select character by window. To select, set the opposite corners of the window that bounds the desired raster character;
·  Select character by polygon. To select, specify vertices of the polygon bounding the desired raster character; to complete the selection, press ENTER.
In case of mistake, repeat the selection procedure.
Click the Add character to library button.
The program will create a topological pattern of the letter and add it to the appropriate section of the patterns library.
The left part of the dialog box display the sections of the current pattern library: digits, English capital, English small, special, national capital, national small. Closed and non-empty sections are marked with “+” sign.

Sections of the current pattern letter library
The box to the left of the section name, when checked, connects all patterns in this section for recognition. Clearing the checkbox removes the connection of all patterns in this section. Any section can be opened by clicking on the field with the “+” sign, and enable or disable the necessary patterns located in this subsection. In order to connect/disconnect the patetrn, check/clear the checkbox to the left of the pattern name.
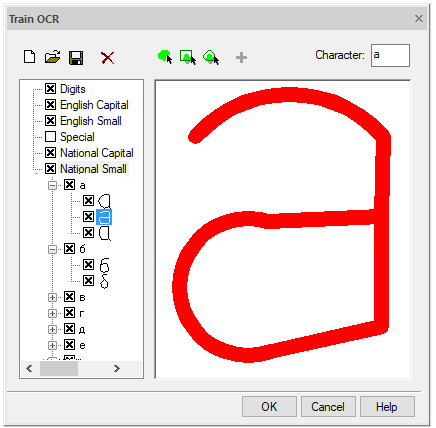
Multiple patterns can be specified for each letter. For example, as shown in the following illustration for the letter “a”. The pattern set corresponding to this letter can be expanded by clicking “+”. The pattern can be selected by clicking on it with the mouse. When you select a pattern, its shape is displayed in the field on the right side of the window.

Creating a letter pattern
Patterns can be both disabled (in this case they will not be used for recognition), and removed.
Removing a letter pattern
1. select the required pattern.
2. click  Remove character button.


 De
De  Es
Es  Fr
Fr  Pt
Pt 
