De
De  Es
Es  Fr
Fr  Pt
Pt 

-
-
-
-
-
-
-
-
-
-
-
-
-
-
-
-
-
-
-
-
-
-
-
-
-
-
-
-
Multiline Text
-
-
-
-
-
-
-
-
-
-
-
-
-
-
-
-
-
-
-
-
-
-
-
-
-
-
-
Multiline Text
 Ribbon: Home, Annotate - Text >
  Multiline Text
Ribbon: Annotate – Text > Multiline text
Menu: Draw – Text >  Multiline Text…
Toolbar: Draw –
Toolbar: Text –
 Command line: MT, MTEXT, MTEXTCREATE, T
Multiline text consists of any number of text lines or paragraphs that fit within a width you specify. It can extend vertically to an indefinite length. Can be split into columns. Multiline text is a single object.
There are more editing options for multiline text than there are for single-line text. For example, you can apply underlining, fonts, color, and text height changes to individual characters, words or phrases within a paragraph.
Draw a rectangular frame by double clicking a point to place multiline text there. Specify the top left corner first and then the bottom right corner.
In the Text format dialog box that opens, set the parameters of the multiline text:

Options:
|
|
Drop-down list to select the text style. |
|
|
Drop-down list to select the font file that defines the style of the characters. |
|
|
Input field for the characters height. |


Text formatting modes
|
|
Bold CTRL + B |
Turns bold formatting on and off for new or selected text. This option is available only for characters using TrueType fonts. |
|
|
Italic CTRL + I |
Turns italic formatting on and off for new or selected text. This option is available only for characters using TrueType fonts. |
|
|
Striked |
Turns strikethrough on or off for new or selected text. |
|
|
Underlined CTRL + U |
Turns underlining on or off for new or selected text. |
|
|
Overlined CTRL + O |
Turns overlining on or off for new or selected text. |
|
|
Copy text format |
Enables/disables the text format copy function. The function allows you to copy the following properties within one multiline text: font, height, style (bold, italic, strikethrough, underline, overline), slant, tracking (character spacing), aspect ratio, text color, text alignment (left alignment, center, justify, right, distributed), line spacing, bulleted and numbered list options, paragraph options (indents, tab stops). To use the function, select a part of the text or place the cursor on the text the properties of which you want to copy. Click the Copy text format button. Select the text to be formatted. To complete the formatting, press ESC or release the Copy text format button. |
|
|
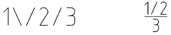
Stack |
The button to convert the selected text to fraction (e.g., 1/2 to ½) and vice versa (e.g., ½ to 1/2). You can use the following symbols to create different types of fractions: · / – slash. Creates a fraction with a horizontal bar, with the numerator and denominator stacked on top of each other and centered
· # – hash mark. Creates a fraction with the numerator and denominator stacked diagonally and separated by a slash
· ^ – caret. Creates a fraction with the numerator and denominator stacked vertically, but not separated by a bar
To enter the symbols /, #, and ^ as text, precede them with the backslash character \ (backslash). For example:
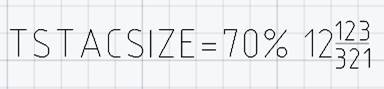
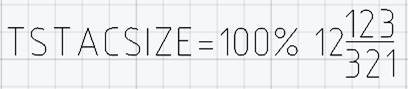
The text height of the numerator and denominator of fractions, as well as superscript and subscript text, is controlled by the TSTACKSCALE variable. The value of the variable is set as a percentage relative to the height of the main text and can vary from 25 to 125%.
|
|
|
Superscript Ctrl+UP ARROW |
Enables/disables input of superscript characters. |
|
|
Subscript Ctrl+DOWN ARROW |
Enables/disables input of subscript characters. |
|
|
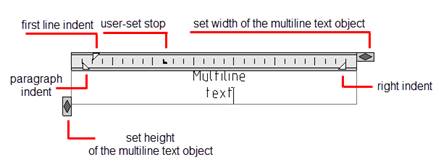
Ruler |
Enables/disables the ruler display. The ruler is displayed at the top of the text area and displays the parameters set in the Paragraph dialog:
Double-clicking the |


 width button adjusts the frame width to the text size.
Columns
|
|
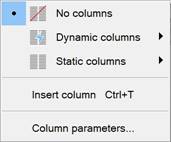
Columns |
Creates and edits multiple columns. Opens the list of parameters:
|
|
|
No columns |
Combines all columns. |
|
|
Dynamic columns |
Dynamic columns modes: · Auto height · Manual height |
|
|
Static columns |
Mode of static columns. Set from 2 to 6 columns. All static columns have the same height and alignment in the edges. |
|
|
Insert column |
Inserts new column manually Ctrl+T |
|
|
Column parameters |
Opens the Column Settings dialog.
· Column type - select the type of columns to be created. · Column Number - set the number of columns. The parameter is available only for the Static Columns option. · Height - displays and sets the height of the column. The parameter is available for editing Static Columns and Manual Height setting for dynamic columns. · Width - Displays and sets column widths and column spacing. Parameter Total - displays the value of the total width of the text object. |

Text alignment
|
|
Change alignment |
Selects the alignment mode for the insertion point and direction |

Text position modes
|
|
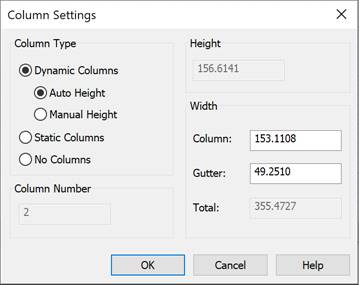
Paragraph |
Opens the Paragraph dialog.
Tabulatios – selects the type of tabulation: Using the Add, Edit, Delete buttons, you can edit the number, type, and value of tab stops. The following characters can be used as separators: comma, period, or space. Left indent – sets the indent to the left of the text frame for a paragraph and for the first line of a paragraph. Right indent – sets the indent to the right of the text frame for a paragraph. Paragraph alignment – enables/disables the mode for text alignment by: Align left, Align center, Align right, Justified, Distributed. Paragraph Spacing – sets the spacing before and after a paragraph. |
|
|
|
Paragraph Line Spacing – sets the line spacing within a paragraph: Exactly – sets a fixed interval between lines, changing the height of characters does not affect the line spacing; |
|
|
|
At least – sets the minimum line spacing required to fit the largest character in a line. If the text height is less than the specified value, the line spacing is determined by the user value. If the text height is greater than the specified value, the line spacing is equal to the text height; Multiple – sets the interval as a multiplier to the text height (from 0,25 to 4). |
|
|
Align left |
Sets the alignment of the text to the left. |
|
|
Align center |
Sets the alignment of the text to the center. |
|
|
Align right |
Sets the alignment of the text to the right. |
|
|
Justified |
Sets the text mode to justified. |
|
|
Distributed |
Sets the text mode to distributed. |

 – setting the position of the left edge of the text line;
 – setting the position of the center of the text line;
 – setting the position by the separator character.


Change the case of selected text
|
|
Uppercase |
Changes the selected text to uppercase (replace the lowercase characters with uppercase). |
|
|
Lowercase |
Changes the selected text to lowercase (replace the uppercase characters with lowercase). |
|
|
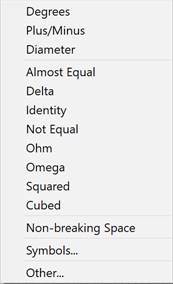
Insert symbol |
Inserts symbol from the list..
It is also possible to insert a non-breaking space by the combination of CTRL+SHIFT+SPACEBAR. keys. Symbols… and Other… open tables with other special symbols. |
|
|
|
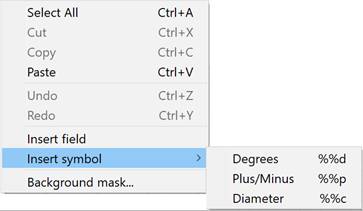
To quickly insert the symbols “degree”, “plus/minus”, “diameter”, you can use the Insert symbol context menu command:
|
|
|
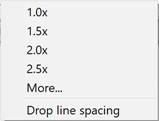
Line Spacing |
Sets line spacing between separate lines in the current or selected paragraph.
1,0x, 1,5x, 2,0x, 2,5x – Set the factor of line spacing as a multiplier on the text height. More… – displays the Paragraph dialog for selecting additional options for adjusting line spacing. Drop line spacing– drop line spacing to default of selected or current paragraph. The default multiline text settings will be applied to this paragraph.
|
|
|
Numbering |
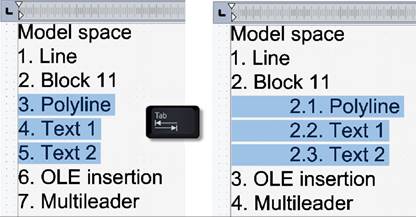
Creates lists with numbers, letters or markers. Off – numbering in turned off. Lettered – alphabeting numeration with selected parameters: Lowercase, Uppercase. Numbered – create numbered list. Bulleted – create bulleted list with a specified marker: dot or hyphen. To create a list, select the text and select the desired type of marking or numbering. To start forming a numbered list, you can enter a number (or a number with a dot) at the beginning of the line and press the TAB key By entering a letter (with or without a dot) followed by a tab, you can start forming a letter list. A period or dash with a tab starts the formation of a bulleted list. It is possible to create several numbered lists at once in one multiline text. In this case, the numbering of the first list in a multiline text may start not from the first element. To start creating such a list, enter the desired initial value (with or without a dot) and press the TAB. key. The list will begin to form from the specified value.
|
|
|
|
The TAB key can be used to shift not only the levels of numbered lists, but also the levels of lettered and bulleted lists, with automatic formatting of the correct markings. |
|
|
|
To create complex nested lists (letters inside numbered lists, and vice versa), you need to select a regular nested list and change its type.
|
|
|
Insert field |
Opens Field dialog box to insert field to the text. |


Additional options
|
|
Determines the forward or backward slant of the text (values from -85 to 85). A positive angle slants text to the right. A negative angle slants text to the left. The switching step with arrows is 1, you can enter a value multiple of 0.0001. |
|
|
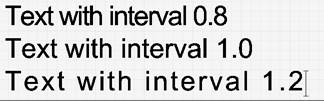
Input field for tracking character spacing (values from 0,75 to 4).
Values less than 1 reduce the interval, values more than 1 increase it. The switching step with arrows is 0.05, you can enter a value multiple of 0.0001. |
|
|
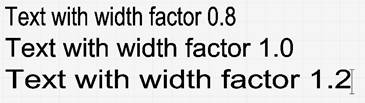
Widens or narrows the selected characters. (values from 0,1 to 10).
The 1 setting represents the normal width of the letter in this font. Set to more than 1 to increase the width, and set to less than 1 to decrease the width. The switching step with arrows is 0,1, you can enter a value multiple of 0,0001. |
|
|
Drop-down list to select the color for the text. |
|
|
Undoes actions in the text editor. |
|
|
Redoes actions in the text editor. |
|
|
Completes editing multiline text and closes the text editor. To do this, you can also use the key combination CTRL + ENTER. |
|
|
Button to open the context menu:
|


To create multiline text:
1. Set the text area by specifying two corners of a rectangle diagonally .
2. Set the required options in the Text format dialog box.
3. Type the text from the keyboard. To move to a new line, press ENTER.
|
|
Attention |
|
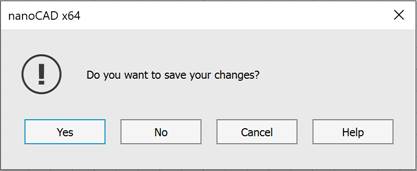
Text can be overlooked if the font size in the Text format dialog box is set too small compared to the scale of the drawing. |

4. To complete typing the multiline text, press the key combination CTRL + ENTER or click OK in the Text format dialog box. You can also click outside the text input area on the drawing to complete the typing of the multiline text. At that, the following prompt to save the changes appears: