De
De  Es
Es  Fr
Fr  Pt
Pt 

-
-
-
-
-
-
-
-
-
-
-
-
-
-
-
-
-
-
-
-
-
-
-
-
-
-
-
-
-
-
-
-
-
-
-
-
-
-
-
-
-
-
-
-
-
-
-
-
-
-
-
-
-
-
-
-
-
-
Linear aligned note
-
-
-
-
-
-
-
-
-
-
-
-
-
-
-
-
-
Linear aligned note
 Main menu: Draw - Notes >
 Linear Aligned note.
Ribbon: Annotate - Leaders >Linear Aligned note.
 Command line: MCLINM, LINM.
Procedure
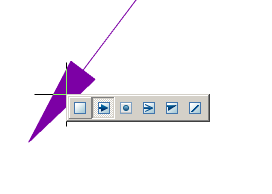
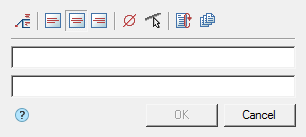
- Call the command. A dialogue will open "Linear aligned note"
- In the "Linear aligned note" dialog box, enter text and define the leader options. Click the "OK" button.
- Specify the subassembly line on which the line subassembly will be located.
- Specify text position.
- "Linear aligned note" will be build.
Menu
-
 Multi-line text - the switch controls the display of multi-line text on the shelf;
 - Align text horizontally;
-
 By left edge
-
 By center
-
 By right edge
-
 Insert special symbol - the command allows you to insert a special character into the input field;
 -
 Select line - the command allows you to relocate the location of the leader line by specifying a line in the drawing;
 -
 Auto repeat - when the switch is on, the "Linear aligned note" command, upon completion of the previous command, is restarted;
 -
 Multiple insert - when the switch is on, the insert is looped. To exit the cycle, press the "Enter" key.
Context menu
The context menu opens in the input field. View Context menu entry fields.
Fields
By default "Linear aligned note" contains 2 input fields.
The first field for the label is above the linear structure, the second - under the linear structure.
The Multi-line text parameter allows you to display multi-line text on the shelf. When this parameter is enabled, the transition to another line is performed by the "Ctrl + Enter" key combination.
Arrow type selection context menu
When you call the context menu on the note arrow (without selecting the note), a dialog box for selecting the arrow type will appear.