

 De
De  Es
Es  Fr
Fr  Pt
Pt 

-
-
-
-
-
-
-
-
-
-
-
-
-
-
-
-
-
-
-
-
Linetypes Dialog
-
-
-
-
-
-
-
-
-
-
-
-
-
-
-
-
-
-
-
-
-
-
-
-
-
-
-
-
Linetypes Dialog
 Command line: STYLEEDITCMDCLASSIC
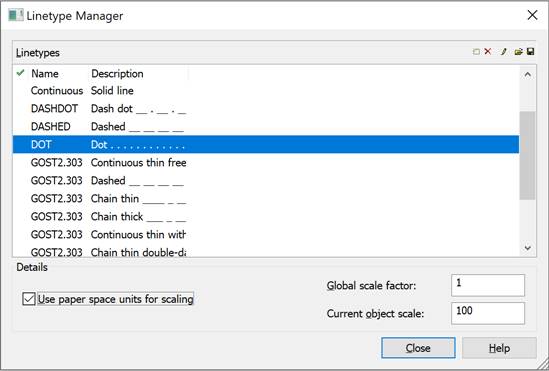
The command opens the classic version of the Linetypes dialog, which is used for compatibility with previous versions of the program. The dialog displays information about all linetypes available in the document. The dialog allows you to load, delete and rename linetypes. The Line Type Editor ( Edit button) is used for editing.
Parameters:
|
Linetypes |
Displays a list of line types loaded in the current document. |
|
|
Displays and sets the current line type. |
|
Name |
Displays and edits the name of the selected line type. |
|
Description |
Displays and edits the appearance and text description of the selected line type. |

Buttons
|
|
Add linetype |
Creates a new linetype based on the one selected from the list. |
|
|
Delete linetype |
Deletes the selected linetype from the current document. |
|
|
Edit linetype |
Button to call the internal Line Type Editor. |
|
|
Load linetype |
Imports linetypes into the current document. |
|
|
Save linetype |
Saves the selected linetypes to a file with the *.LIN extension. |


Details
|
Use paper space units for scaling |
Sets the same scale for linetypes in paper and model spaces. This option is useful when using several viewports at the same time. |
|
Global scale factor: |
Sets the global scale factor value for all linetypes. |
|
Current object scale: |
Sets the linetype scale value for newly created objects. The resulting scale is equal to the product of the global scale and the current scale. |
To perform operations with linetypes, the Linetypes dialog also has a context menu:
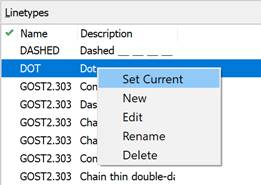
To set the linetype as current:
1. In the dialog box, select the desired linetype by left-clicking.
2. Click in the leftmost field opposite the selected line type. Moving the check box to this field indicates that the line type is set as current.
To create a new linetype based on an existing one:
1. In the Linetypes dialog box, select the appropriate linetype by clicking.
2. Click the  New button. A new row with the default name Linetype1 will appear in the list of linetypes.
3. Click Linetype1, specify the name for the new linetype.
4. In the Description column, enter information about the linetype.
5. Click the  Edit button.
6. Make the necessary changes in the Linetype Editor that opens.
7. Click OK to close the Linetype Editor.
8. Click Close to exit the Linetypes dialog box.