
 De
De  Es
Es  Fr
Fr  Pt
Pt 

-
-
-
-
-
-
-
-
-
-
-
-
-
-
-
-
-
-
-
-
-
-
-
-
-
-
-
Object Grouping Dialog
-
-
-
-
-
-
-
-
-
-
-
-
-
-
-
-
-
-
-
-
-
-
-
-
-
Object Grouping Dialog
 Ribbon: Home – Group >
  Dialog for Creating Groups
Toolbar: Group – Dialog for Creating Groups
 Command line: G, CLASSICGROUP, GROUPCMD
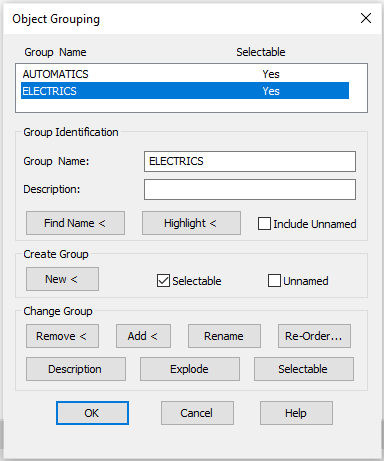
The command opens the Object Grouping dialog box where there is a list with the names of existing groups in the document and descriptions for every group that is selectable:
Parameters:
Group Identification
|
Group Name: |
Specify a group name. |
|
Description: |
Displays the description of the group (if it was specified during group creation). |
|
|
This button temporarily closes the dialog box for selecting an object when you need to clarify its group. |
|
|
Enables/Disables highlighting a group’s objects on the screen. |
|
Including Unnamed |
Switches on/off the input of unnamed groups in the list in the Object Grouping dialog box. |


Create Group
|
|
This button temporarily closes the dialog box for selecting the objects of a group. |
|
Selectable |
Switches on/off the mode of whole group selection if one object is selected. The selection is controlled by the PICKSTYLE variable: · if the variable has a value of 1, then when selecting any object in the group, all objects in the group are also selected; · if the variable has a value of 0, then when specifying an object, only that object is selected. |
|
Unnamed |
Switches on/off the mode for creating unnamed groups. |

Change Group


To create a group:
1. Enter the name for the created group and its description in the Group Name and Description fields of the Group Identification section. A name can consist of letters, figures or special symbols. The Description field can be empty.
2. Select the New button to temporarily close the dialog box to select the objects of a group.
3. Select the objects, press ENTER.
4. Select OK in the opened dialog box.
To identify a group:
1. To define the groups the object belongs to, select the Find Name<.
2. After the dialog box temporarily closes, specify an object on the screen.
3. The Group Member List dialog box opens with all groups the selected object belongs to:
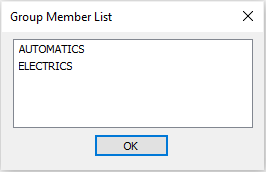
4. Select OK to get return to the previous dialog box.
5. Select OK to close the Group Member List dialog box.
To delete objects from a group:
1. Select a group in the list.
2. Deselect the Selectable checkbox.
3. Select Remove<.
4. Select the objects to delete.
5. Select the End option (in the context menu or command line).
6. Select OK to close the dialog box.
Note: The description of the group is saved when all the objects are deleted from the group. To delete a group from a document, select Explode.
Note: When a group is deleted from a document, objects of the group are not deleted.
To add objects to a group:
1. Select group in the list.
2. Select Add<.
3. Select the objects to add.
4. Select the End option (in the context menu or command line).
5. Select OK to close the dialog box.
note: When adding objects belonging to other groups to a group, the Selectable checkbox should be deselected. If it is selected, the groups that the objects belong to will be added to the group.
To rename a group or change a description:
1. Select the group.
2. Make changes in the Group Name and Description fields of the Group Identification section.
3. Select the Rename or Description.
The messages like Group name has been updated or Group description has been updated and are shown in the bottom left corner.
4. Select OK to close the dialog box.
To change the order of objects in the group:
1. Select the group.
2. Select Re-Order.
3. Specify the required parameters in the Order Group dialog box:
Parameters:
|
Group Name |
List of existing groups. |
|
Description |
Shows the description of the selected group in the list (if it was specified when the group was created) |
|
Remove from position (0-3) |
Field to enter the current position (number) of the object in the group. |
|
Enter new position number for the object (0-3): |
Specifies the new position number of objects in a group. |
|
Number of objects (less than 4): |
Specifies the number of objects, whose positions are changed. |
|
|
This button changes the positions of objects in the group. |
|
|
This button opens the Object Grouping dialog box to display the order of objects in the group. |
|
|
This button changes the objects into their opposite order. |


note: The order of object numbering is the order in which objects were selected when they were added to the group. Numbering starts from 0.
note: You can change the positions of several objects at once.
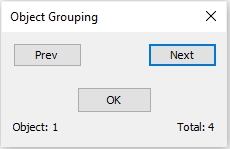
The Highlight temporarily closes the Order Group dialog box and opens the Object Grouping dialog box:
Parameters:
|
|
The button for the previous object selection. |
|
|
The button for the next object selection. |
|
Object: 1 |
Shows the current position of the object in the group. |
|
Total: 4 |
Shows the number of objects in the group. |


note: A selected object is highlighted on the screen.
Group Command (Non-Dialog Mode)
Command line: -GROUP
The command to create, fill and edit groups of objects.
Command options:
|
? |
Outputs to the command line a list of names and descriptions of existing groups. |
|
Order |
Changes the ordinal numbers of objects in a group. Position number – specifies the position number of the object whose order is being changed. To change the order of several objects, specify the number of the first of them. Reverse number – changes the order of objects to the opposite. |
|
Add |
Adds objects to the group. |
|
Remove |
Deletes objects from the group. When deleting all objects from a group, the definition (description) of the group remains in the document. |
|
Explode |
Deleting a group. The definition (description) of the group is deleted. Objects included in the group are not deleted from the document. |
|
REName |
Edits the name of the existing group. |
|
Selectable |
Changing the group selectability in a document (managing by the PICKSTYLE variable): · if the group is selectable, PICKSTYLE = 1, when selecting any object in the group, all objects in the group are also selected; · if the group is non-selectable, PICKSTYLE = 0, when specifying an object, only that object is selected. |
|
Create |
Creates the named group. A group name can be up to 25 characters long and can contain letters, numbers, and special characters (dollar sign "$", hyphen "-", and underscore "_") |
Command prompts:
|
Enter a group option [?/Order/Add/Remove/Explode/ REName/Selectable/ Create] <Create>: |
Select an option or press ENTER to create a named group. |
|
Enter a group name or [?]: |
Enter a name for the new group and press ENTER. Or select the ? option to view a list of names and descriptions of existing groups. If the name matches the name of an existing group, the command line additionally prompts: Group 'A' already exists. Redefine it? [Yes/No] <No>: Yes – the definition (description) of the group will be changed; No – the group will not be created. |
|
Enter a group description: |
Enter a description for the new group and press ENTER. You can leave the description blank. |
|
Select objects or [?]: |
Select objects and press ENTER to create the group. Or select the ? option to display additional object selection options. If the selected set of objects matches an existing group in the drawing, the command line additionally prompts: Group 'B' with the same objects already exists. Create a new group anyway? [Yes/No]: Yes – a new group will be created: Group 'A' was created. No – a group will not be created: Nothing selected. No group created. |
|
|
Selection of the Order option. |
|
Enter a group name or [?]: |
Enter the name of an existing group in which you want to change the position numbers of objects and press ENTER. There must be at least two objects in a group. Or select the ? option to view the list of names and descriptions of existing groups. |
|
Enter position number of the object to reorder (0 - 1) or [Reverse order]: |
Enter the current position (position number) of an object in a group and press ENTER. Object numbering starts with zero. Or select the Reverse order option to change the current order of objects to the opposite. |
|
Enter new position number for the object (0 - 3): |
Enter a new position number for an object in a group. |
|
Enter number of objects to reorder (1 - 4): |
Enter the number of objects whose position numbers are being changed. |
|
|
Selection of the Add option. |
|
Enter a group name or [?]: |
Enter the name of an existing group to which you want to add objects and press ENTER. Or select the ? option to view a list of names and descriptions of existing groups. |
|
Select objects [?/End]: |
Select objects and press ENTER (or select the End option) to add them to the group. Or select the ? option to display additional object selection options. |
|
|
Selection of the Remove option. |
|
Enter a group name or [?]: |
Enter the name of an existing group from which you want to remove objects and press ENTER. Or select the ? option to view a list of names and descriptions of existing groups. |
|
Select objects [?/End]: |
Select objects and press ENTER (or select the End option) to remove objects from the group. The command line displays the number of removed and remaining objects in the group. Or select the ? option to display additional object selection options. |
|
|
Selection of the Explode option. |
|
Enter a group name or [?]: |
Enter the name of an existing group you want to remove and press ENTER. Or select the ? option to display a list of names and descriptions of existing groups. |
|
|
Selection of the REName option. |
|
Enter a group name to rename or [?]: |
Enter the name of an existing group you want to rename and press ENTER. Or select the ? option to display a list of names and descriptions of existing groups. |
|
Enter a new name for group or [?]: |
Enter the new group name and press ENTER. |
|
|
Selection of the Selectable option. |
|
Enter a group name or [?]: |
Enter the name of an existing group for which you want to change the selectability property and press ENTER. Or select the ? option to view a list of names and descriptions of existing groups. |
|
This group is not selectable, do you want to change it [Yes/No]?: |
For non-selectable groups, select the option: Yes – the value of the PICKSTYLE variable for the group will be 1 (when selecting any object in the group, all objects in the group are selected); No – the value of the PICKSTYLE variable for the group will remain 0 (when selecting an object in the group, only that one is selected). |
|
This group is selectable, do you want to change it [Yes/No]?: |
For selectable groups, select the option: Yes – the value of the PICKSTYLE variable for the group will be 0 (when selecting an object in the group, only that one is selected); No – the value of the PICKSTYLE variable for the group will remain 1 (when selecting any object in the group, all objects in the group are selected). |