-
-
-
-
-
-
-
-
-
-
-
-
-
-
-
-
-
-
-
-
-
-
-
-
-
-
-
Gamma Correction
-
-
-
-
-
-
-
-
-
-
-
-
-
-
-
-
-
-
-
-
-
-
-
-
-
-
-
-
-
Gamma Correction
 Ribbon: Raster – Processing >
  Gamma Correction
 Menu: Raster – Processing the raster >
  Gamma Correction …
 Command line: GammaEdit
 This functionality is available only in the Raster module.
This operation is used to enhance the overall quality of an entire image by changing its so-called “color profile” through an algorithm that changes the distribution of brightness of image points.
Points with intermediate values of color intensity are usually unevenly distributed and form a curve (gamma) of an arbitrary shape. The gamma value determines the slope of the curve exactly halfway between the white and black points. Changing the gamma increases or decreases the brightness of points that fall within a certain brightness range, as well as changes the brightness of red, blue and green colors.
1. Select raster images to be processed.
2. Run the command.

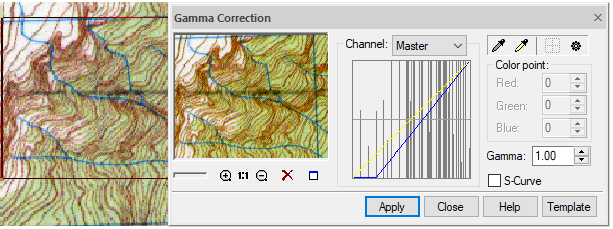
In the Gamma Correction dialog box that opens:
3. Set white and black points by selecting them with the eyedroppers on the image.
4. Select a color channel.
5. Create a gamma curve automatically or adjust it manually.
6. Click Apply.
Setting black and white points
To select the values of white and black points directly on the image, use the eyedroppers  Black point and
  White point. Select the appropriate eyedropper and outline an area on the screen.
You can fine tune the color values in the Color point section of the dialog box.
If color values other than (0,0,0) for black and/or (255,255,255) for white points are specified in this section, then points outside the specified range will not be gamma corrected.
The  Auto set button calculates the white and black point values for each color channel. The histogram in the middle of the dialog box displays the distribution of brightness of the colors. The curve can be changed for each channel separately.
Press to return the gamma curve to its original view, click  .
.
Changing the gamma curve
There are three ways to change the shape of gamma curve of the Master channel and curves of individual channel curves. These ways are inteconnected.
1. Check or clear the S-Curve box. S-curve is a form of gamma curve that is always symmetrical about the center point of the distribution range. This means that by adding brightness to dark areas, we automatically darken bright areas to the same level and as a result the image looks better balanced in brightness. If the S-Curve checkbox is cleared, you can create a gamma curve by moving the overall brightness balance in the resulting image.
2. Entering a value in the Gamma field changes the slope of the curve.
3. Move the curve of the Master channel or curves for individual channels in the histogram window.
If the Master is selected in the Channel list, all curves are shown.
When you move the mouse cursor over the curve, a marker appears in the form of a point, which can be moved by changing the slope of the curve. If you hold the mouse cursor on the curve, you can see the real distribution of brightness of the image colors.
To change the shape of curves for red, blue and green channels, select the corresponding channel from the Channel list.
In some images you can also “split” the Master curve into components (red, blue and green) by clicking the Auto set button.


 De
De  Es
Es  Fr
Fr  Pt
Pt 
