

 De
De  Es
Es  Fr
Fr  Pt
Pt 

-
-
-
-
-
-
-
-
-
-
-
-
-
-
-
-
-
-
-
-
-
-
-
-
-
-
-
-
-
-
-
-
-
-
Design of Rows and Columns
-
-
-
-
-
-
-
-
-
-
-
-
-
-
-
-
-
-
-
-
-
-
-
Design of Rows and Columns
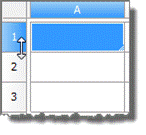
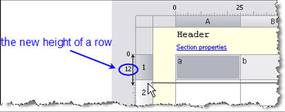
To adjust the height of a row or the width of a column, use the sliders located on the rulers (horizontal and vertical). Move the slider by clicking it and holding down the left mouse button whilst dragging it. While adjusting the height or width, their values are highlighted in color for easy monitoring.
When you select columns, context buttons appear:
Add column left – the command adds the required number of columns to the left of the selected ones, corresponds to the Insert column context menu command.
Delete selected columns – the command deletes the selected columns, corresponds to the Delete column context menu command.
Add column right – the command adds the required number of columns to the right of the selected ones, corresponds to the Insert column context menu command.
When you select rows, context buttons appear:
Add row above – the command adds the required number of rows above the selected ones, corresponds to the Add row context menu command.
Delete selected rows – the command deletes the selected rows, corresponds to the Delete row context menu command.
Add row bottom – the command adds the required number of rows below the selected ones, corresponds to the Add row context menu command.
Add row – adds a new empty row below the selected row. When the command is called, a dialog box for entering the number of rows opens.
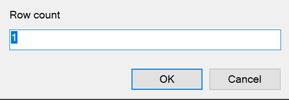
Insert row – adds a new empty row above the selected row. When the command is called, a dialog for entering the number of rows opens.
Delete row – deletes the selected row.
Hide row – hides the row. The row is not visible either in the editor or in the drawing.
Show hidden rows – shows hidden rows. To use the command, select several rows between which the hidden rows are located.
Start new page – a switch that controls the page break before the selected row.
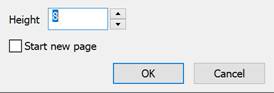
Properties... – opens the row properties dialog. The row properties dialog specifies the height in millimeters. The Start new page switch inserts a page break before the selected row:
Convert to – converts a row to one of the report sections. Depending on the position of the row (top, bottom or middle), different sections are available for conversion.
Cut – cuts data from a row.
Copy – copies data from a row.
Paste – pastes previously cut or copied data into a row.
|
|
Note |
|
When selecting multiple rows, the commands will apply to all selected columns. |

Add column – adds a new empty column after the selected column. When the command is called, a dialog box for entering the number of columns opens.

Insert column – adds a new empty column before the selected column. When the command is called, a dialog box for entering the number of columns opens.
Delete column – deletes the selected column.
Hidden – a switch that hides the column. The column is displayed in the editor, but not displayed in the drawing.
Properties... – opens the column properties dialog box. The column properties dialog box specifies the width in millimeters. The Hidden switch hides the column. The column is displayed in the editor, but not displayed in the drawing. The Substitute zeros switch (in numeric cells with a zero value, the cells should have a numeric format) controls the replacement of the cell contents with the specified text:
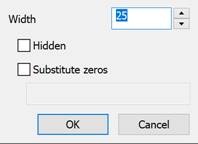
IMPORTANT! The format of the cell text value is set in the cell properties on the Content tab.
Cut – cuts data from a column.
Copy – copies data from a column.
Paste – pastes previously cut or copied data into a column.
Sort ascend – sorts the table in ascending order relative to the selected column.
Sort descend – sorts the table in descending order relative to the selected column.
|
|
Note |
|
When selecting multiple columns, the commands will apply to all selected columns. |
Edit – switches the cell to the edit mode
Properties... – opens the Cell Properties dialog.
Expression... – opens the Expression Builder dialog.
Group... – groups the selected cells.
Ungroup... – ungroups the selected cells.
Split... – splits the cell into several rows and columns. When the command is called, the Regroup dialog appears.
Cut – cuts data from the selected cells to the clipboard.
Copy – copies data from the selected cells to the clipboard.
Paste – inserts data from the clipboard.
Clear – clears the selected cells.
Insert table – inserts a range of cells copied from Excel.