Drawing specifications
IDH_MCS_07
 Functional panel:Specification (Project Manager).
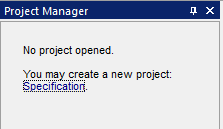
To create a new project, click on the link "Specification".
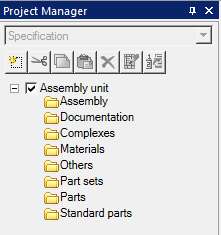
When creating a project, a head empty assembly unit is created. An assembly unit includes default specification sections.
 Create - the command allows you to create an entry or empty head assembly unit.

 Cut - the command cuts an entry for later insertion into another assembly unit.
 Copy - the command copies the entry for subsequent insertion into another assembly unit.
 Paste - command inserts a previously cut or copied entry. The insertion is made in the same section of the specification from where the entry was cut or copied.
 Delete - command deletes entry.
 Delete specification - the command opens the specification editing dialog.
 Create position - the team creates a position on the occurrences: Assembly units, Details, Standard products, Other products and Materials.
Creating an empty head assembly unit
1. On the toolbar, click  "Create".
2. In the drop-down menu, select "Create empty head assembly unit".

3. The head assembly will be created.
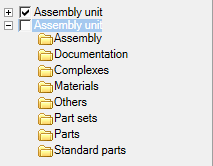
The active build is marked with an enabled switch.
1. On the toolbar, click  "Create".
2. In the drop-down menu, select "Create entry".

3. Select entry.
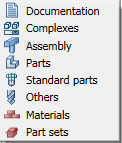
4. In dialogue "Creating entry" fill in the required parameters. Depending on the type selected, different fields will be available.
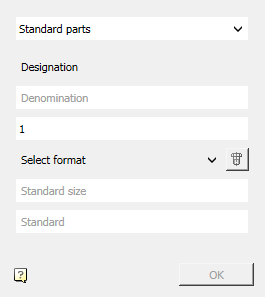
5. After entering all the necessary parameters, the "OK" button will be available. Confirm your entry.
6. The entry is added to the project manager tree.
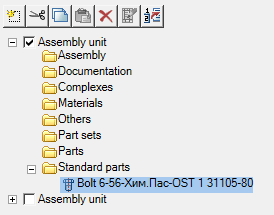
1. Select an entry in the tree.
2. Below the tree will be available options panel for editing.
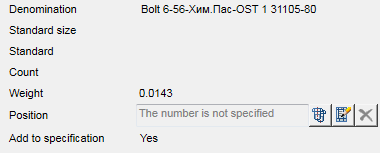
1. Select entry: Assembly units, Parts, Standard products, Other products or Materials.
2. Click the button on the toolbar  "Create position".
3. Insert a position in the drawing and fill in the data in "Position leader edit".
4. The position field at the entry will be associated with the position in the drawing.

After creating a position, the following commands will be available:
· Show position - shows the position on the drawing.
· Edit position - open "Position leader edit".
· Reset position number - deletes position number.
If a group type is set in the BOM settings, the sections of the performances will be available in the list of sections.

When placing the entry in the execution, the section "Executions" and the entry of the execution will be added in the tree of the assembly unit of the project manager.
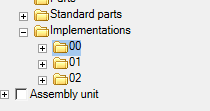
The occurrence of the performance is called for editing by double-clicking the LMB. The dialogue allows you to create in the performance of new entries or copy them from the permanent data.
The dialog box consists of the sections: "Variable data" and "Permanent data".
In the section "Permanent data" are the occurrences of the specification. When you click on the "+" button, the entries are copied into the execution (in the section "Variable data").
In the section "Variable data" are occurrences of performance. Clicking on the "+" button will create an empty entry.
An empty entry can be edited by changing its Type, Designation, Name and Quantity.
To remove an entry from a performance, press the "-" button opposite the entry.
 Main menu: Mechanical - Part list -
  Part list.
 Ribbon: Mechanical - Part list -
  Part list.
 Toolbar:
  Part list ( "Part list").
 Command line: MCSPECIFICATION.
 Refresh - refreshes numerals affixed, if they were not put down or changed the rules prostanovki item numbers.
 Numbering - replaces characters "x" item numbers.
 Export the drawing - creates the drawing table nanoCAD Mechanica 23 to output specifications for printing means nanoCAD.
Editing operation positions Specifications:
 Cutting position of editor.
 Copying position in the buffer.
 Paste position.
 Add record.
 Deletes the current record.
 Move up and move down - changes the position of the selected row specification.
 Sort - sort position alphabetically within sections.
1
 Add balloon - balloon to create the BOM item, if has not been set previously.
 Properties -Setting Specifications.
 Find the drawing - moves the current view and highlights the position of the drawing.
In the upper left corner of the specification contains the fields relating to the weight of the product.

Text field contains the calculated value of the product weight.
When you turn jackdaws Update estimated value product weight is automatically saved to the "weight" of the title block of the drawing.
 Gray shaded box in the column specification section shows that this section does not contain any information.
 Left mouse click on the symbol "Plus" can open (close) the contents of this specification section.
Relocating the entry between partitions
To transfer the recording details in another section hold down the left mouse on the portable recording and release it above the title of the desired topic.

Transferring records to section Assembly Units
To edit a template specification in the drop-down menu window Editor specifications tap Tools. In the drop-down list, select Change type, in the dialog box, select the desired template specification.
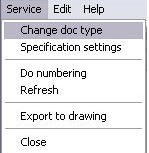
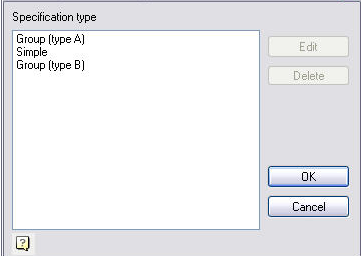
In the same dialog options are available edit and delete the selected template - through the configuration dialog specification.
Specifications Configuration Dialog
Settings dialog specification includes the following tabs:
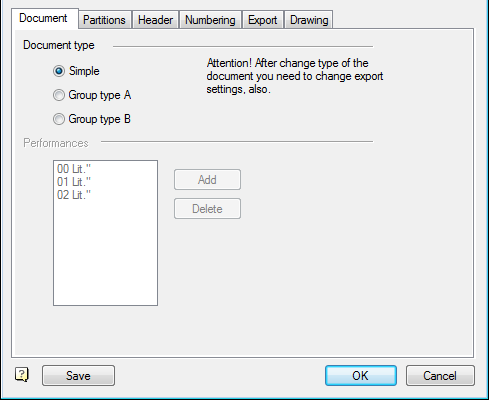
Tab document defines the type of document and marking performances.
The following types of specifications:
· Simple
· Group Type A
· Group B Type
When choosing a Type A or Type B list becomes active performances. List of performances can be edited (by clicking "Add" or "Delete")
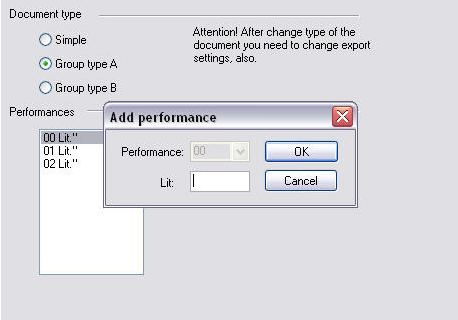
Double-clicking on performance causes him to edit. In the editing dialog can associate the letter execution.
Categories tab allows you to customize the specifications section.
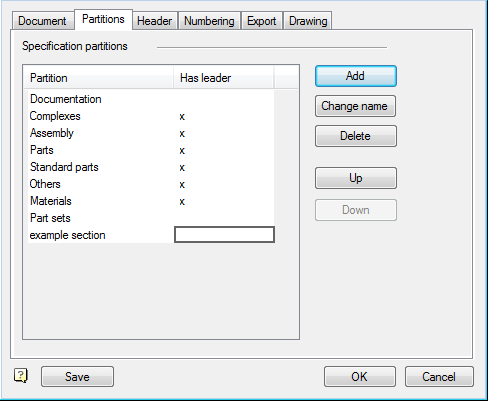
The partition table determines which sections and in what sequence will be present in the specification, and for which one has a notation of the specification callouts. Double-click on the field "Has the callout" enables or disables the callout for the corresponding section.
Controlling the placement of sections in the specification is performed using the "Up" and "Down."
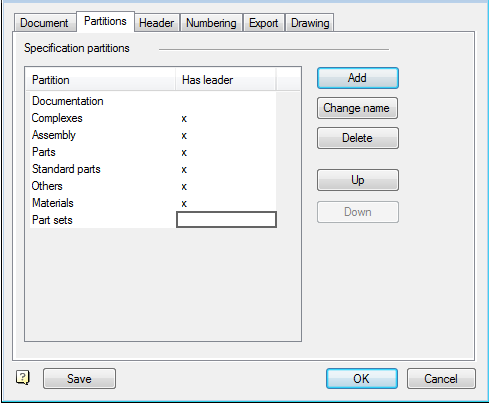
The "Name Change" Allows you to change the name of the selected partition.
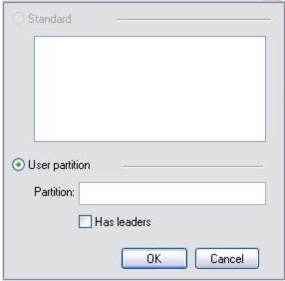
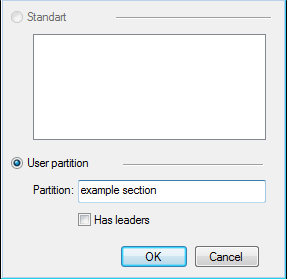
"Add" button brings up a dialog to add a topic specification. Sections are added one by one. You can add a section with the standard name (if not already present in the specification) or with an arbitrary name. Galka "Has callout" duplicates the corresponding value in the partition table.
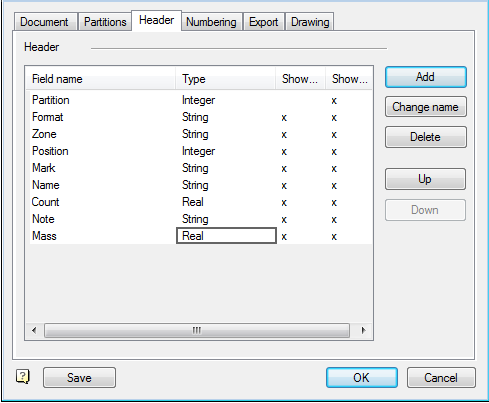
Title tab controls the composition and order of the fields used in the construction specifications.
Table fields specification includes the field name, type, and switches the display position in the editor and the editor specifications. Use the "Name Change", "Add", "Remove" edited list of fields.
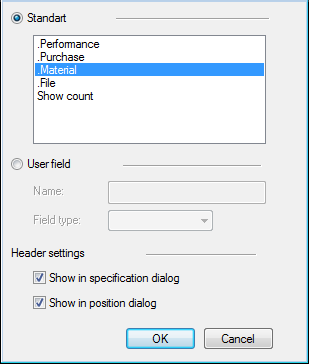
Button "Add field" brings up a dialog where you can add fields from a predefined list, or an arbitrary field, specifying the type and display in the editor position and specification.
On this tab, adjusted the numbering of positions in the specification.
On the Export grouped items export settings in the drawing and specifications in Excel.
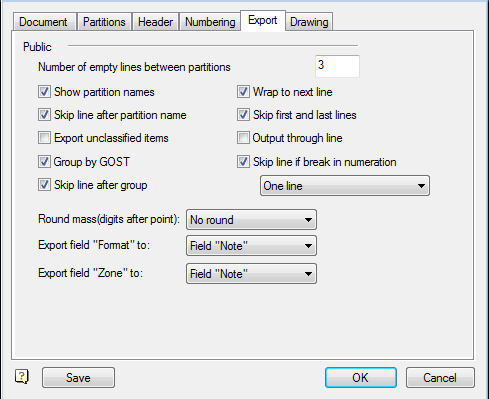
General settings:
See sections - controls the display section headings in the exported specification.
Skip the line after section - includes extra blank line in the specification table between sections.
Must positions without partitions - if enabled, the position is not related to any section will be included in the export specification.
Grouped by GOST - one standard parts will be grouped general heading (for example, "nut OST 26-2041-96").
Skip the line after group - add a blank line after grouped according to GOST positions.
The number of skipped lines between sections - number of blank lines between sections of the specification.
Migrate to the next line - includes transfer to the next line with a long name products. If this option is disabled, the item name will be entered into a table cell.
Skip first and last lines - pass includes the first and last row of the table in the template specification.
Output at the line - each position specifications will be displayed with a space in one line.
Skip the line at break numbering - if the positions do not follow the order, after nonconsecutive lines added a line under a missing item. If the drop-down list shows a miss "single line" - that regardless of the number of missing items will be added only one empty line. If the drop-down list select a miss "depending on the gap," the number of rows to skip will depend on the size of the gap. (For example, if after 6 position followed by the position 9, then 2 lines will be skipped).
Followed by the output settings of the field "Format" field and "Zone" - show them in the "Comments", "Format" and "Zone" respectively, or do not show at all.
Option Rounding weight controls rounding up masses of parts made to specification. If nobhodimosti rounding on weight, you should select the required word length.
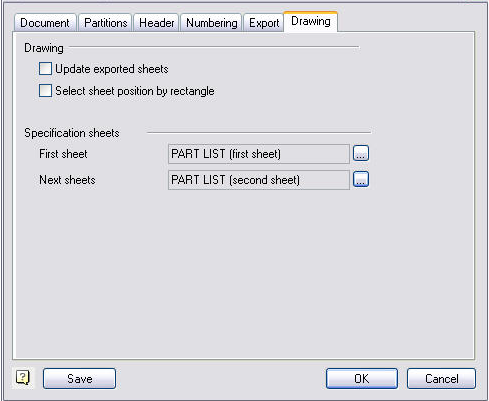
Update specification sheets in the drawing - Includes automatic update of tables exported to the drawing specifications. The update is performed on the export specification drawing. Accommodation in this specification is not requested again.
Specify the insertion point selection rectangle - when this option is enabled the position of each sheet exported to the drawing specifications not given an indication of the insertion point, but an indication of the rectangular boundary of the placing on the drawing sheet.
Export Settings on the drawing table designation include serving template specification for the first and subsequent sheets.
When you click on  the table selection dialog opens.
Setting up a custom type specification
· Go to the drop-down menu Specification type simple.

· Go to the tab "Partitions".

· Click on the Delete button and select the sections that you do not need or you do not use. In the sections of specifications provided by the State standard, The current setting, can be removed but removing them from the system is impossible. At any time, you can edit the style specification and return these sections.
· Click on the Add button. At the top of the dialog box, in the "Standard", posted sections that are removed from the system. Go to "User Partition" and create your profile.
The result can be seen in the figure below.
· Go to the tab "Header".

Add a new field type.

· On the "Numbering" it is possible to set a rule for the numbering and skip to the desired position.
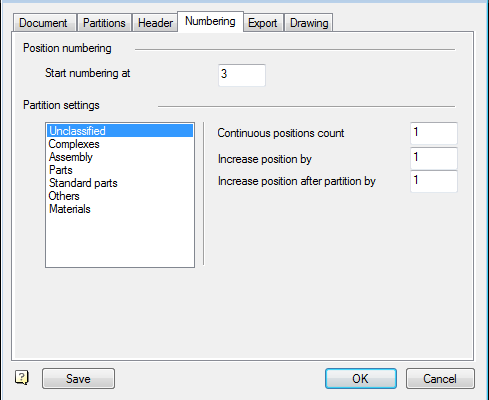
· Tab "Export" link provides specifications and user table that allows you to customize the specification of any complexity.

· Tab "drawing." On this tab, click the button  . In the dialog box, choose from the database tables for the first and subsequent sheets.
Create a table for a custom specification
Open Table Editor and create a new table.
To create a custom specifications in the table must specify the header field specification and the field "title block". Export records to be made in the fields below fields defined as "Title".
To set the BOM header must select a table cell and, from the context menu "Properties". In the "Value" enter the header field specifications with the prefix $TITLE_.
For example $TITLE_Name.
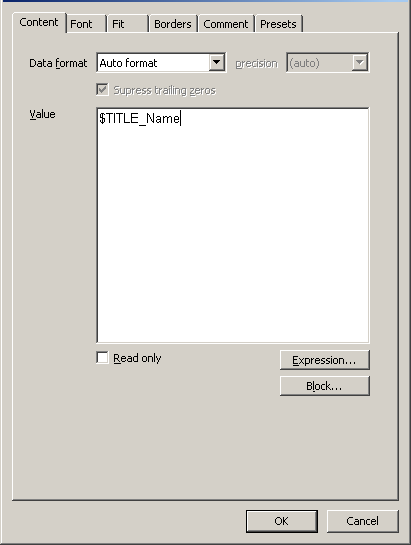
To limit the filling column specification adjustment must be at the bottom line allowed to enter in the "Value" line $END. Otherwise the filling will be made before the end of the table or subtable.
To transfer data from the main drawing caption (for example, the fields of the title block specification) must be in the "Value" enter the value with the prefix $SHTAMP_. The cell named $SHTAMP_Name be entered value of the "name" of the title block of the drawing.
After registration table accordingly to save it in a database under the appropriate name for later use.
 Main menu: Mechanical - Part list -
  Balloons.
 Ribbon: Mechanical - Part list -
  Balloons.
 Toolbar: Part list -
  Balloons.
 Command line: MCPOSITION.
When you point to elements of attachment parts for nanoCAD Mechanica 23 recognizes the size of parts mounting connections without additional indication of its components.
When making a specification of the assembly drawing mechanism can be set dynamically related to the title block of assembly component external DWG-file.
All changes in the linked drawing die subassembly (rooms, mass node) will automatically be reflected in the general specification.
Notation of the position of the standard item
When selecting compounds for a fastening nanoCAD Mechanica23 Auto detects the typical preset sizes of fastening elements with no additional input. The construction indicators-fit , degree of hardness and the cover for standard parts should be set individually, depending on the specific conditions of the assembly operation.
Additional lables (Precision , modelling procedure, thread tolerance , degree of hardness etc , must be entered among the truss symbols. In the ballon editor (or in the part list editor), double click the entry field to enter additional information on the modelling procedure of a fastening.

The information input on performance of standard details.
Pick the start point and the second point , defining the position of the underscore , the position leader edit dialog appears.

To group balloons according to the type, left click on the partition field.From the drop-down menu choose the desired option to which the part is referring.
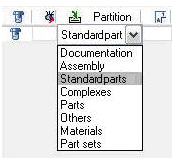
The mark, Name, note and mass fields can be set by the user.
If the item name is too long, you can enable the forced transfer it to the next line. To do this, add a control character \n.

At the specification export, the posiotion name will be broken onto two lines.If the format is on the drawing then for the specification table the drawing zone is added automatically.
If a format is present on the drawing for positions on the specifications, the zone of the drawing is automatically added.
The shape of the balloon can be set in the symbol tabof the construction site 4 option below.
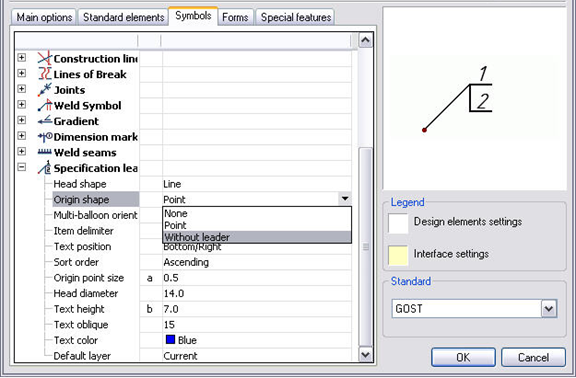
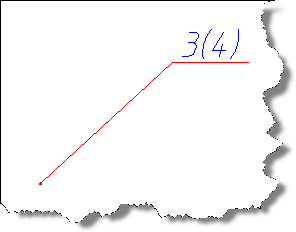
To display the quantity of positions connected with given leader, it is necessary to select the mark.

The total of the details of the given position will be displayed on the drawing next to the position number within brackets.
Going into the editor specifications

Checkboxes for the number of items, click on the icon Specification. This icon is located in the dialog editor specifications and in the main toolbar nanoCAD Mechanica 23.
Blocked Ballon Insertion on the drawing
If the ballon leader is applied to the item that has already been entered in the part list , it is shown in the figure with a vertical extension line.
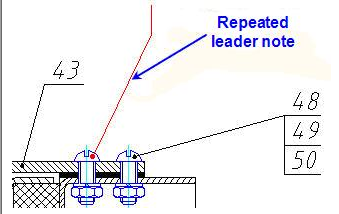
Repeated leader
If such repeated ballons are meant to be any reason , double click the red leader.
In the dialog window, double-click on each of x-symbols in the column used to block ballon insertions.

Close the window by clicking x symbol in the upper right corner the part numbers will appear in the drawing.
Adding Construction Indicators to Standard Parts
When you point to elements of attachment parts for nanoCAD Mechanica 23 recognizes the size of parts mounting connections without additional indication of its components. Design features (landing, strength class, coating) standard parts, depending on the specific conditions of the site must be specified separately.
Additional notation (class, performance, tolerance thread, class, etc.) must be entered instead of a hash sign ("#").
Editor position (or BOM editor), double-click on an editable cell to enter additional information about the execution of the fastener.
When selecting components for a fastening, nanoCAD Mechanica auto-detects the typical preset sizes of fastening elements with no additional input. The construction indicators - fit, degree of hardness and the cover for standard parts should be set individually, depending on the specific conditions of the assembly operations.
Additional labels (precision, modelling procedure, thread tolerance, degree of hardness etc.) must be entered among the truss symbols. In the ballon editor (or in the part list editor), double-click the entry field to enter additional information on the modelling procedure of a fastening.

The information input on performance of standard details
Creating performance and item positions , before inserting into the drawing
To create an additional position for an item which has already been identified on the drawing, use the  "Add position/perfomance" option. Click on this icon and the Select position record dialog will open. In it, the earlier insertion positions are displayed.
|
Note: |
In the Select position record dialog, only those positions that have been identified by number are displayed. |
If the specification editor settings mean that a group view of the document is shown, the Select position record dialog contains two parts. The top part of the window displays the list defore the inserted positions, and the bottom part of the window - the list of position perfomances. If a line is chosen in the top part of a window, the new perfomance of the selected line will be added in the position editor. If a line is chosen in the bottom part of a window, the selected perfomance will be added.
 Main menu: Mechanical - Part list -
  Position align.
 Ribbon: Mechanical - Part list -
  Position align.
 Toolbar:
  Position align ( "Part list").
 Command line: MCPOSALIGN.
Command allows you to align the numbers callouts specification. To do this, you must first select which items will be subject to equalization, then - in the context menu to specify alignment options.
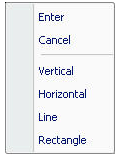
Following options are available:
· Vertically.
· Horizontally.
· Line - an indication of the line along which the rooms are arranged
· Rectangle - specifies a rectangular area around which aligned numerals.
 Command line: MCRECSPEC.
Master recognition specification enables automatic search and replace specifications created from individual primitives nanoCAD, transforming them into an object "Specification" nanoCAD Mechanica23. Initial primitives are in the drawing.


 De
De  Es
Es  Fr
Fr  Pt
Pt 
