-
-
-
-
-
-
-
-
-
-
-
-
-
-
-
-
-
-
-
-
-
-
-
-
-
-
-
-
-
-
-
-
Construction Note
-
-
-
-
-
-
-
-
-
-
-
-
-
-
-
-
-
-
-
-
-
-
-
-
-
Construction Note
 Ribbon: Home, Annotate – Leaders >
  Construction note
 Menu: Draw – Notes >
  Construction notes…
 Toolbar: Utilities, Leaders –
 Command line: NOTEP
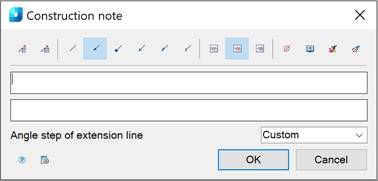
This command opens the Construction note dialog box to set the note options:

Options:
Buttons to add borders:
|
|
Managing multiline text output above the leader. |
|
|
|
Framing the text under the leader. |
|
Use the icons to select the style of the extension line:
|
|
|
None. |
|
|
|
Arrow. |
|
|
|
Point. |
|
|
|
Open arrow. |
|
|
|
Half-arrow. |
|
|
|
Oblique. |
Use the icons to select the text alignment method:
|
|
|
By left edge. |
|
|
|
By center. |
|
|
|
By right edge. |
Other icons and options:
|
|
The Insert special symbol icon opens the panel with the table of special symbols, to select and insert them at the current cursor position in the text input field. |
|
|
The Notepad icon opens the Notepad dialog box. |
|
|
The Match properties icon temporarily closes the dialog box to specify the inserted leader whose properties should be copied and applied to the newly-created leader. |
|
|
The Add extension line icon is used to insert additional extension lines. The icon is enabled when you edit a leader inserted into the drawing. |
|
Angle step of extension line |
Drop-down list to select inclination. In the list the following inclinations are available: · Custom - the extension line is placed arbitrarily (by default); · 15 - the extension line is placed in step multiples of 15°; · 30 - the extension line is placed in step multiples of 30°; · 45 - the extension line is placed in step multiples of 45°; · 90 - the extension line is placed in step multiples of 90°. |
|
|
The Options button opens the nanoCAD Design Settings dialog box – Symbols tab. |
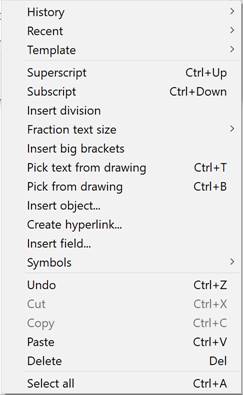
Right-click in the text field and choose the required menu item:

For more information about additional commands, see the Mechanical Note section.
To create a construction note:
1. Type the required text into the text fields.
2. Select the required note options.
3. Click OK.
4. Specify a point on the object to which the leader arrow will be directed.
5. Specify the shelf position on the drawing.


 De
De  Es
Es  Fr
Fr  Pt
Pt 


