
 De
De  Es
Es  Fr
Fr  Pt
Pt 

-
-
-
-
-
-
-
-
-
-
-
-
-
-
-
-
-
-
-
-
-
-
-
-
-
-
-
-
-
-
-
-
-
-
-
-
-
-
-
-
-
-
-
-
-
-
-
-
-
-
-
-
-
Basic tools
-
-
-
-
-
-
-
-
-
-
-
-
-
-
-
-
Basic tools
Main menu commands
File
-
Open file... - loads table data from a file. Files available for download: * .tbl, * .dat, * .mdb (only for 32-bit Windows), * .txt, * .csv, * .xml, * .xls, * .xlsx. When you select an Excel file, only the first sheet of the workbook is inserted.
-
Open database... - opens a dialog of library to select a table saved in the database.
-
Save as file... - writing a table to an external file *.dat, *.txt, *.cvs, *.xml, *.xls.
-
Save to database... - writing the table to the base of elements.
-
Edit Form... - opens the form editor. Using the form, you can filter data, control the composition and style of the table.
-
Show Form... - opens the table filter form.
-
Imtort from Excel - the command transfers the results of calculating tabular data from an open MS Excel workbook. The content of the active sheet or a selected range of cells is transferred.
-
Export to Excel - the command is designed to transfer tabular data to MS Excel. After clicking the button, the "Conversion options" dialog opens. After specifying the options, a new Excel workbook is opened and all tabular data is transferred into it, while maintaining the cell formatting set in the table.
-
Close - saves changes and closes the editor.
-
Close without saving - closes the editor without saving changes.
Edit
-
Undo - undo the last action.
-
Redo - redo the last undone action.
-
Cut - cuts data from selected cells to the clipboard.
-
Copy - copies data from the selected cells to the clipboard.
-
Paste - pastes data from the clipboard.
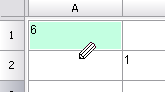
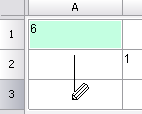
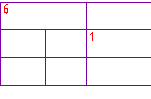
Pencil - serves for splitting cells into several by building additional borders.
-
Select material... - This tool is designed to insert into a table, technical requirements and technical characteristics of a formatted line-record for material and assortment. Clicking on the button brings up the "Material" dialog box.
-
Auto calculate expressions - controls the mode of automatic recalculation of values of table cells. By default, the auto-recalculation mode is on.
-
Recalculate - serves to recalculate data in a table after editing cell values or correcting formulas.
-
Auto update reports - controls the mode of automatic recalculation of the report. The mode is on by default.
-
Reports - update of the report.
-
Synchronize - updates the table with data from a linked file. Available if the table was loaded from a file. For correct synchronization, the data changed in the file must be previously saved.
View
-
Show rulers - switch, controls the display of the ruler.

-
Show expressions -switch manages the formula bar display.

-
Formula visualization - switch, controls the display of the formulas in cells.
-
Zoom to objects - centers the original report objects in the drawing.
-
View sorting - controls the display of the sort buttons of the view.
Turned on Turned off 

-
Calculator... - the command calls calculator.
-
Notebook... - the command calls notebook.
Column
-
Add column - adds a new empty column after the selected column.
-
Insert column - adds a new empty column before the selected column.
-
Delete column - deletes the selected column.
-
Hidden - switch, hides the column. The column appears in the editor but does not appear in the drawing.
-
Properties... - open properties of column.
Row
-
Add row - adds a line below the selected one.
-
Delete row - deletes the selected row.
-
Hide row - hides the line. The line is not visible in both the editor and the drawing.
-
Show hidden rows - shows hidden lines. To use the command, you must select several lines between which hidden lines are located.
-
Sort ascending - sorts the table in ascending order relative to the selected column.
-
Sort descending - sorts the table in descending order relative to the selected column.
-
Custom sort... - opens a dialogue "Collections editor".
-
Merging and Grouping... - opens a dialogue "Row grouping and merging".
-
Start new page - switch, controls the page break before the selected line.
-
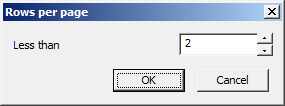
Limit rows per page... - opens the "Rows per page" dialog, which indicates the maximum number of lines per page. If there are more lines, a page break is inserted.
-
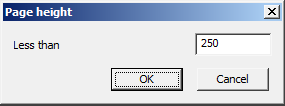
Limit page height... - opens the "Page height" dialog in which the maximum page height is indicated. If the page height is greater than the specified height, a page break is inserted.
-
Single page - the command removes all created page breaks.
-
Up to down - switch, controls the data display sequence.
-
Properties... - opens string properties.
Cell
-
Edit - puts the cell into edit mode.
-
Expression... - opens a dialogue "Expression builder".
-
Properties... - opens a dialogue "Cell properties".
-
Group - merges the selected cells.
-
Ungroup - corrodes the selected cells.
-
Split... - splits a cell into multiple rows and columns. When the command is called, the "Split" dialog appears.

-
Cut - cuts data from the selected cells to the clipboard.
-
Copy - copies data from the selected cells to the clipboard.
-
Paste - pastes data from the clipboard.
-
Clear - clears the selected cells.
-
Insert table - pastes a range of cells copied from Excel.
Section
-
Header of first page - adds a header for the first page.
-
Header of following pages - adds a header for pages.
-
Header of last page - add a header for the last page.
-
Insert Data section - inserts a data section. If the selected cell is in the data section, then an empty row is added.
-
Insert Report section - adds a report section. Used when building reports.
-
Footer of first page - adds a footer for the first page.
-
Footer of following pages - adds a footer for pages.
-
Footer of last page - add footer for the last page.
Toolbar commands
-
Open - allows you to choose one of two commands:
 Open file- loads table data from a file. Files available for download: * .tbl, * .dat, * .mdb (only for 32-bit Windows) * .txt, * .csv, * .xml, * .xls, * .xlsx. When you select an Excel file, only the first sheet of the workbook is inserted.
 Load from base- opens a dialog of standard elements to select a table saved in the database.
 -
Save - allows you to choose one of two commands:
 Save to base- writing the table to the base of elements.
 Save to file- writing a table to an external file * .dat, * .txt, * .cvs, * .xml, * .xls.
 -
 Import table from Excel - the command transfers the results of calculating tabular data from an open MS Excel workbook. The content of the active sheet or a selected range of cells is transferred.
 -
 Export table to Excel -the command is designed to transfer tabular data to MS Excel. After clicking the button, the "Conversion options" dialog opens. After specifying the options, a new Excel workbook is opened and all tabular data is transferred into it, while maintaining the cell formatting set in the table.
 -
 Update table from external source - updates the table with data from a linked file. Available if the table was loaded from a file. For correct synchronization, the data changed in the file must be previously saved.
 -
 Pan and zoom view to show objects - centers the original report objects in the drawing.
 -
 Cut selection - cuts data from the selected cells.
 -
 Copy selection - copies data from the selected cells.
 -
 Paste from clipboard - pastes data from the clipboard.
 -
 Undo last change - undo the last action.
 -
 Redo last change - redo the previously undone action.
 -
 Move row down - moves the selected line down.
 -
 Move row up - moves the selected line up.
 -
 Move column left - moves the selected column to the left.
 -
 Move column right - moves the selected column to the right.
 -
 Page division -the tool is designed to split the table into separate parts, without losing integrity. With this function it is possible to split a large table in order to fit on the format, and still retain the ability to edit the table as a single object.
 -
 Open form - opens the table filter form.
 -
 Sort ascend - sorts the table in ascending order.
 -
 Sort descend - sorts the table in descending order.
 -
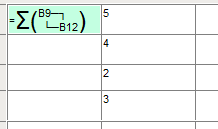
 Create summary function - sums the contents of the selected cells.
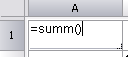
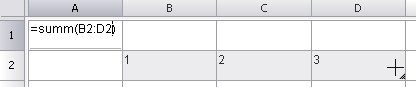
Procedure:
1. Select the cell in which you want to calculate the amount, press
"Create summary function".
2. Select the cells whose contents you want to summarize, press "Enter".
-
 Open calculator - the command calls
calculator.
Open calculator - the command calls
calculator. -
 Open notebook - the command calls notebook.
 -
 Insert material - This tool is designed to insert into a table, technical requirements and technical characteristics of a formatted line-record for material and assortment. When you click on the button, a dialog box is called "Material".
 -
 Special symbols - inserting a
special character from the list.
Special symbols - inserting a
special character from the list. -
 Recalculate table - serves to recalculate data in a table after editing cell values or correcting formulas.
 -
 Automatic calculation - controls the mode of automatic recalculation of values of table cells. By default, the auto-recalculation mode is on.
 -
 Update reports - update of the report.
 -
 Automatic report update - controls the mode of automatic recalculation of the report. The mode is on by default.
 -
 Group selection - serves to combine the selected table cells into one.
 -
 Ungroup selected cells - cancels the merge for the selected cells.
 -
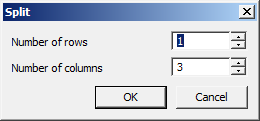
 Change number of rows and columns - serves to change the number of rows and (or) columns in the selected range of cells.
Procedure:
1. Select one or more cells and call the command.
2. In the "Split" dialog box that appears, enter the desired numeric values to stake.
-
 Split table cell with pencil tool - serves for splitting cells into several by building additional borders.
To split a cell with the mouse cursor, specify the start and end points of the segment that will divide each cell it crosses into two.
Right-clicking on a cell border removes that border.
-
 Select cell style - calls the window for applying the style to the selected cells.
 -
Text alignment - serves to control the placement of text in selected cells. Additional buttons are available by pressing the black triangle. The purpose of the buttons is clear from the figure on each of them.

-
Fitting text horizontally - controls the horizontal alignment of text in the cell. The following options are available in the drop-down list:
 No horizontal tolerance
 Shrink horizontally
 Word wrap
 -
Fitting text vertically - controls the vertical alignment of text in the cell. The following options are available in the drop-down list:
No vertical tolerance Shrink text height
 Expand row height
 Add virtual rows
 -
Borders - is designed to control the display of the borders of the selected cells. When you click on the black triangle, additional buttons for displaying borders become available. The purpose of the buttons is clear from the figure on each of them.

-
Color of borders - drop-down list for choosing border colors. To set the border color, you must first select a color and then select the border (using the
 "Borders" command) to which you want to apply the specified parameters.
-
Lineweight of borders -drop-down list of border thickness selection. To set the border thickness, you must first select the thickness and then select the border (using the
"Borders"command) to which you want to apply the specified parameters.
-
Text style - drop-down list for choosing the text style of the cell.
-
Text height - drop-down list for selecting the height of the cell text.

-
Text color - drop-down list for choosing the color of the cell text.
-
Text weight - drop-down list for choosing the thickness of the lines of the cell text.

-
Selected cell coordinate field - displays the coordinates of the selected cell (s) and allows you to enter them.

-
Row expressions - formula input field. The line is displayed if the "Main menu - View - Show expressions" switch is active.