
 De
De  Es
Es  Fr
Fr  Pt
Pt 

-
-
-
-
-
-
-
-
-
-
-
-
-
-
-
-
-
-
-
-
-
-
-
-
-
-
-
-
-
-
-
-
-
-
-
-
-
-
-
-
-
-
-
-
-
-
-
Area array
-
-
-
-
-
-
-
-
-
-
-
-
-
-
-
-
-
-
-
-
-
-
-
-
-
-
-
-
-
-
Area array
 Main menu: Construction - Utilities >
 Area array.
Ribbon: Construction - Utilities >Area array.
Toolbar: Utilities >Area array.
 Command line: SPARDARRAY.
The tool is designed to replicate objects within a given area.
Procedure
1. Call the command "Area array". A dialogue will open "Area array".
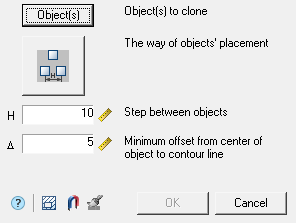
2. Click the "Object(s)" button and select the original objects to copy in the drawing. Press the "Enter" key to complete the selection.
3. Select the method of placing the copied objects using the graphic switch:
 - Rhombus.
 - Square.
 - Triangle.
4. Specify the spacing (H) between adjacent copies. The  "Pick from drawing" button allows you to select a step from the drawing.
5. Specify the minimum indent (?) from the edge of the area. The "Pick from drawing" button allows you to select an indent from the drawing.
6. Set the area of the array in one of three ways:
-
 "Select an area by the point". The construction area is formed from a set of closed areas. The command allows you to add closed areas to the set by clicking the LMB inside a closed contour in the drawing. Clicking again inside the contour removes the selected area from the set. To complete the selection, press the "Enter" key.
 -
 "Select contour with the magnet". The contour of the array area is set using the utility "Magnet".
 -
 "Paint area". The command allows you to specify an arbitrary placement of copied objects, providing a set step between adjacent copies. This command is available only after selecting the source objects to copy.
The construction of the area is carried out by moving the mouse cursor over the drawing (construction must be started from the location of the original objects). As you move the cursor, markers will appear on the screen to indicate where the copied objects are inserted.
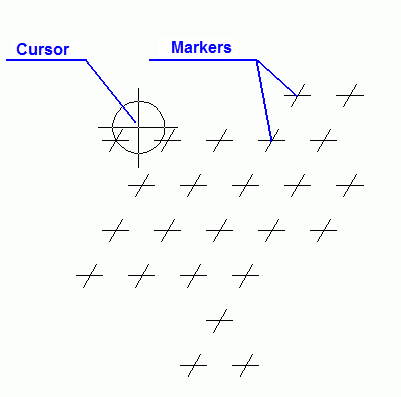
To remove insertion markers, press and hold the "Shift" key. When you hover over a marker, the marker will be deleted.
To temporarily disable the placement of markers, press and hold the "Ctrl" key.
Finish drawing the area by clicking LMB. An array by area will be built.
7. Click the "OK" button. An array by area will be built.