De
De  Es
Es  Fr
Fr  Pt
Pt 

-
-
-
-
-
-
-
-
-
-
-
Creating a DEM Based on Point Clouds
-
-
-
-
-
-
-
-
-
-
Creating a DEM Based on Point Clouds
 Ribbon: Point Clouds > Aerial Laser Scanning >
  Create a DEM based on point clouds
Menu: Point Clouds > ALS >  Create a DEM based on point clouds
Toolbar: ALS >  Create a DEM based on point clouds
 Command line: PC_CLOUDS_TO_DEM
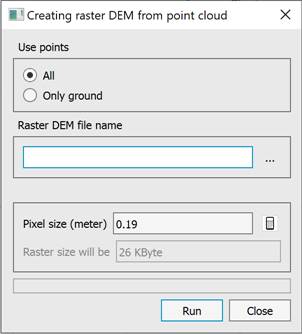
The Creating Raster DEM dialog is designed to create a height raster from all open point clouds. You can use all points or only points of the Ground class. The DEM is created in TIF format.
To determine the pixel size, there is a button that sets the pixel size based on the average distance between points in the smallest cloud (it is assumed that all clouds have approximately the same distance between points). If you enter the pixel size manually and press Enter, the field with the DEM file size for that pixel size will be filled in.
For calibration, it is sufficient to set the pixel size to 2-3 times the average distance between points. To create an orthophoto, the pixel size can be reduced to one average distance between points. In any case, making the pixel smaller than the average distance between points is pointless, as the model quality does not improve, but the processing time increases.