-
-
-
-
-
-
-
-
-
-
-
-
-
-
-
-
-
-
-
-
-
Visualization
-
Visualization
Video Recording from the Screen
 Ribbon: Visualization >
  Start of Recording
 Menu: Visualization 3DScan >
  Start of Recording
 Toolbar: Visualization 3DScan >
  Start of Recording
 Command line: START_VIDEO_RECORDING
The command allows to record video from the screen.
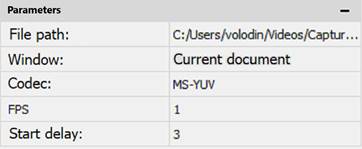
The command parameters are set in the Properties bar.

|
Path to file |
The path to the recorded video file on the disk. |
|
Window |
Selecting the recording area - recording the area of the current document or the entire program window. |
|
Codec |
Video codec installed in the system to be used for video recording. |
|
FPS |
The number of frames per second. May depend on the selected codec |
|
Delayed start |
Delay in seconds before starting to write to the fille. |
|
|
Note |
|
To record and play video clips, it is necessary to install an additional set of special encoding and decoding codecs. A mandatory requirement: the set should include the Xvid library! |
Pause recording and stop recording are performed by the commands:
 Ribbon: Visualization >
  Pausing Recording
 Menu: Visualization 3DScan >
  Pausing Recording
 Command line: PAUSE_VIDEO_RECORDING
 Ribbon: Visualization >
  Stop Recording
 Menu: Visualization >
  Stop Recording
 Command line: END_VIDEO_RECORDING


 De
De  Es
Es  Fr
Fr  Pt
Pt 

