nanoCAD Mechanica Module
Installation of Fasteners
Installation of fasteners in nanoCAD Mechanica can be done by dragging and dropping from the library, or by using the Threaded fastening function.
Installation of fasteners by dragging from the library is recommended when the fasteners are a single product, not a package (set of components). The Threaded fastening function makes it easier and faster to install fasteners that consist of several standard items.
Open the dialog Library → Standart parts library or use the following path in the classic interface: Mechanica → Standart Parts → Standart parts library.
Expand Fasteners → General machinery → Rivets → Extended precision and select the flat-oval head rivet GOST 14800-85 (Fig. 58).
Move the selected element to the upper line of the workpiece 1. Once the snap is triggered, click to fix the rivet insertion point.
Turn on ORTHO mode (F8) and specify the insertion direction.
In the new window, click the Measure distance button (Fig. 59) and specify the upper and lower points of the plates to be fastened.
The Thickness of packet will show the corresponding value. The rivet shank parameters will change accordingly.
Select the Unriveted rivet option and click OK (Fig. 60)
Install the Riveted rivet in the same way. No need for the thickness of the packet to be measured, since the system remembers the previous value.
Install the Rivet with countersunk head GOST 14798-85 on the second package.
The final version of the installation of rivets is shown in Fig. 61. Save the file to the Exercises folder.
Move the cursor to the top line of the first sketch. When the line is highlighted in green, click on it. Fix the position of the attachment in the ORTHO mode with another click outside the package (Fig. 63).
The Fasteners dialog box will appear. By default, some mounting options will be offered. You can visually evaluate it on the Preview tab and adjust or replace the products and structural elements of the package on the Template tab.
Click on next to Screw in the box. The part selection dialog will open.
Find (you can use the search) and select GOST 7783-81 - Cup nibbed head bolt. The information on the Template tab is updated.
Next, select the washer, nut and split pin in the same way:
The final view of the modified template is shown in Fig. 64.
Adjust the holes built with the bolted connection if necessary: double-click on the centerline to enter the fixture editing mode.
By using this option, the new fastener package will not be saved in the list of templates in the Fasteners dialog.
In the second sketch, construct the screw connection by creating a new template.
In order to create a new template in the Fasteners dialog box, click on the corresponding button located in the upper left corner (Fig. 66). Enter the new template’s name.
Add a GOST 17473-80 screw, and then add a washer and holes: smooth according to GOST 11284-75 and thread blind.
Correct the screw length and edit the hole parameters (fig. 67).
The final view of bolted and screwed connections is shown in Fig. 68.
Save the file to the Exercises folder.
Installation of fasteners by dragging from the library is recommended when the fasteners are a single product, not a package (set of components). The Threaded fastening function makes it easier and faster to install fasteners that consist of several standard items.
1. A single fastener installation with the example of rivets.Open the Installation of the rivets.dwg file.
Open the dialog Library → Standart parts library or use the following path in the classic interface: Mechanica → Standart Parts → Standart parts library.
Expand Fasteners → General machinery → Rivets → Extended precision and select the flat-oval head rivet GOST 14800-85 (Fig. 58).
Move the selected element to the upper line of the workpiece 1. Once the snap is triggered, click to fix the rivet insertion point.
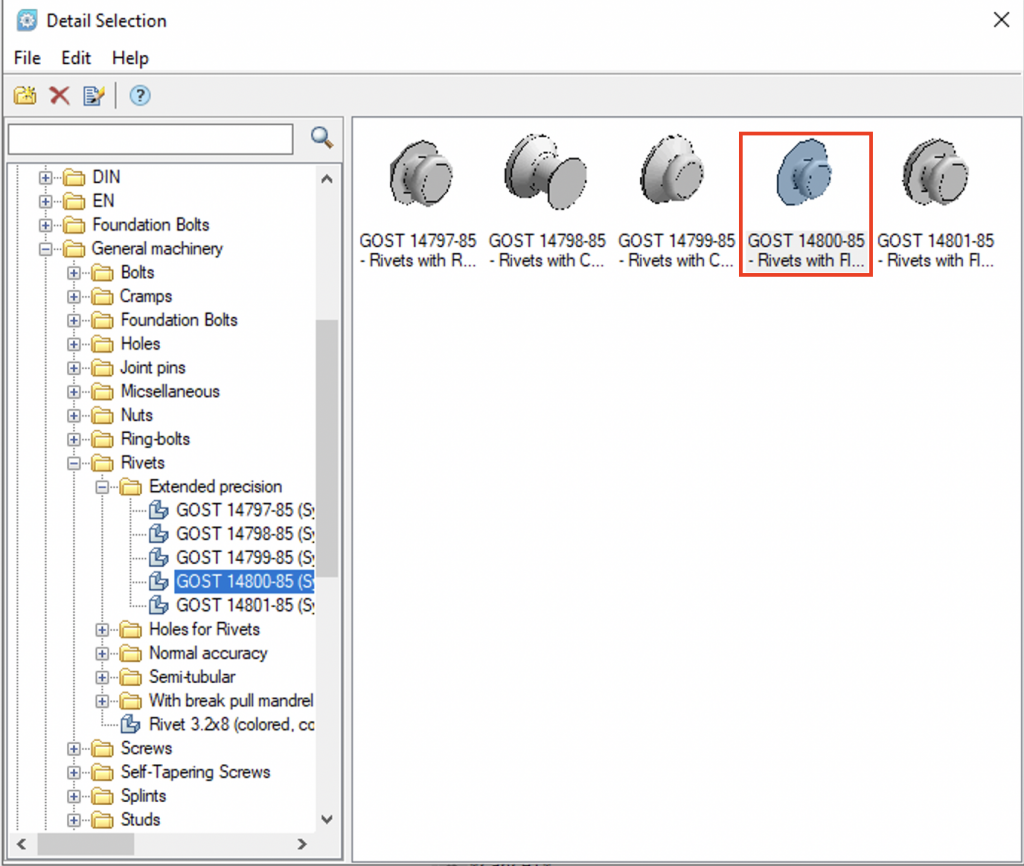
Fig. 58. Selecting and inserting a rivet
Turn on ORTHO mode (F8) and specify the insertion direction.
In the new window, click the Measure distance button (Fig. 59) and specify the upper and lower points of the plates to be fastened.
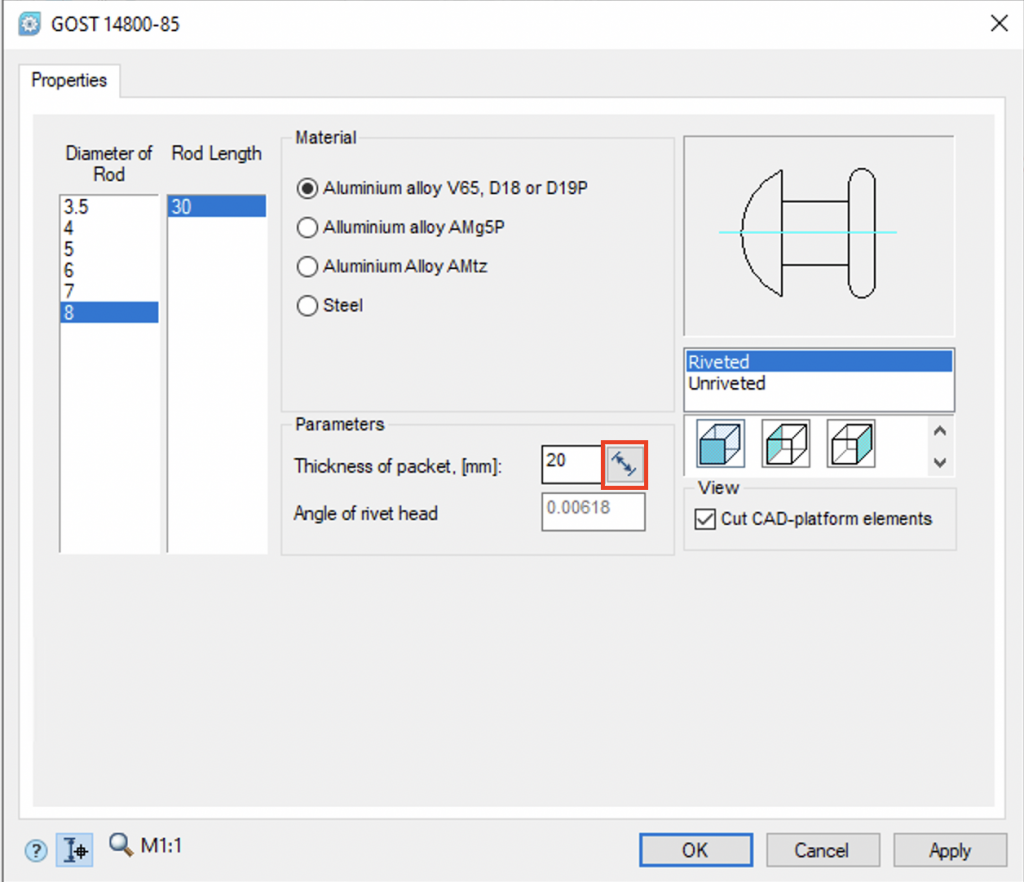
Fig. 59. Distance parameters of the rivet
The Thickness of packet will show the corresponding value. The rivet shank parameters will change accordingly.
Select the Unriveted rivet option and click OK (Fig. 60)
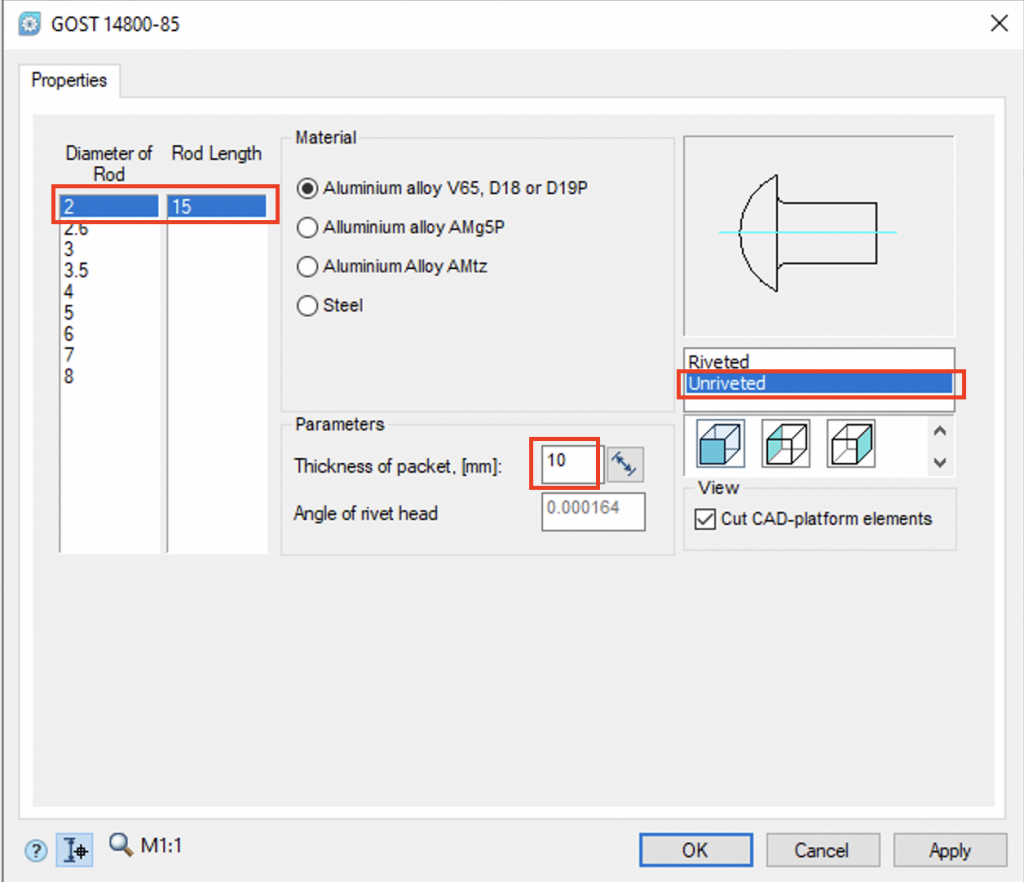
Fig. 60. Changed rivet parameters
Install the Riveted rivet in the same way. No need for the thickness of the packet to be measured, since the system remembers the previous value.
Install the Rivet with countersunk head GOST 14798-85 on the second package.
The final version of the installation of rivets is shown in Fig. 61. Save the file to the Exercises folder.

Fig. 61 Final view of installed rivets
2. Let’s install the fastening by using the Threaded fastening function.Open the Installation of bolted and screw connections.dwg file. Click on the Threaded fastening button on the Design tab (Fig. 62).
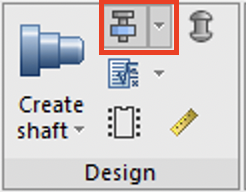
Fig. 62. Threaded fastening command
Move the cursor to the top line of the first sketch. When the line is highlighted in green, click on it. Fix the position of the attachment in the ORTHO mode with another click outside the package (Fig. 63).
The Fasteners dialog box will appear. By default, some mounting options will be offered. You can visually evaluate it on the Preview tab and adjust or replace the products and structural elements of the package on the Template tab.
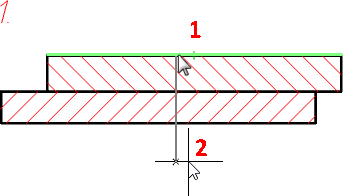
Fig. 63. Selecting the location of the bolted connection
Click on next to Screw in the box. The part selection dialog will open.
Find (you can use the search) and select GOST 7783-81 - Cup nibbed head bolt. The information on the Template tab is updated.
Next, select the washer, nut and split pin in the same way:
• washer GOST 11371-78
• nut GOST 5933-73
• split pin GOST 397-79
The final view of the modified template is shown in Fig. 64.
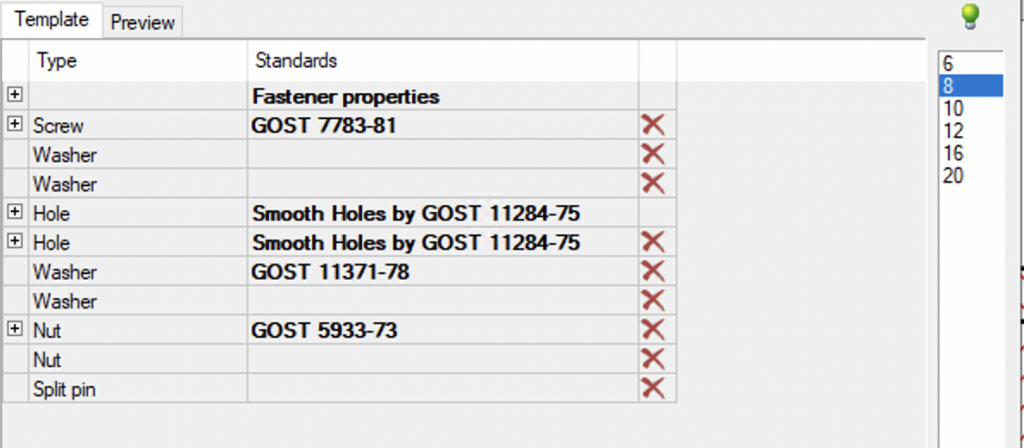
Fig. 64. Changed template
Adjust the holes built with the bolted connection if necessary: double-click on the centerline to enter the fixture editing mode.
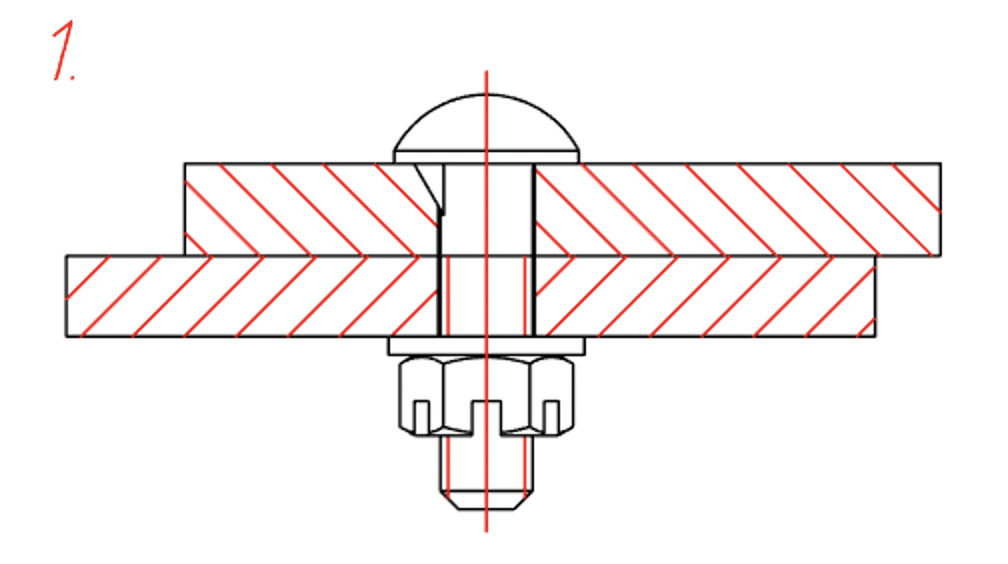
Fig. 65. The final view of the bolted connection
By using this option, the new fastener package will not be saved in the list of templates in the Fasteners dialog.
In the second sketch, construct the screw connection by creating a new template.
In order to create a new template in the Fasteners dialog box, click on the corresponding button located in the upper left corner (Fig. 66). Enter the new template’s name.
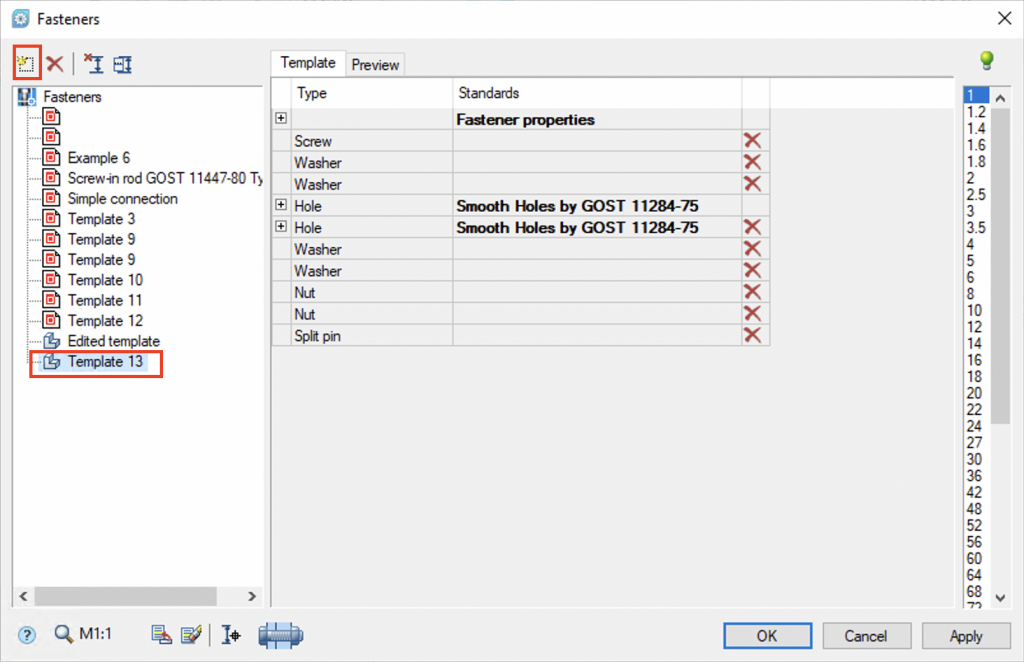
Fig. 66. Creating new template
Add a GOST 17473-80 screw, and then add a washer and holes: smooth according to GOST 11284-75 and thread blind.
Correct the screw length and edit the hole parameters (fig. 67).
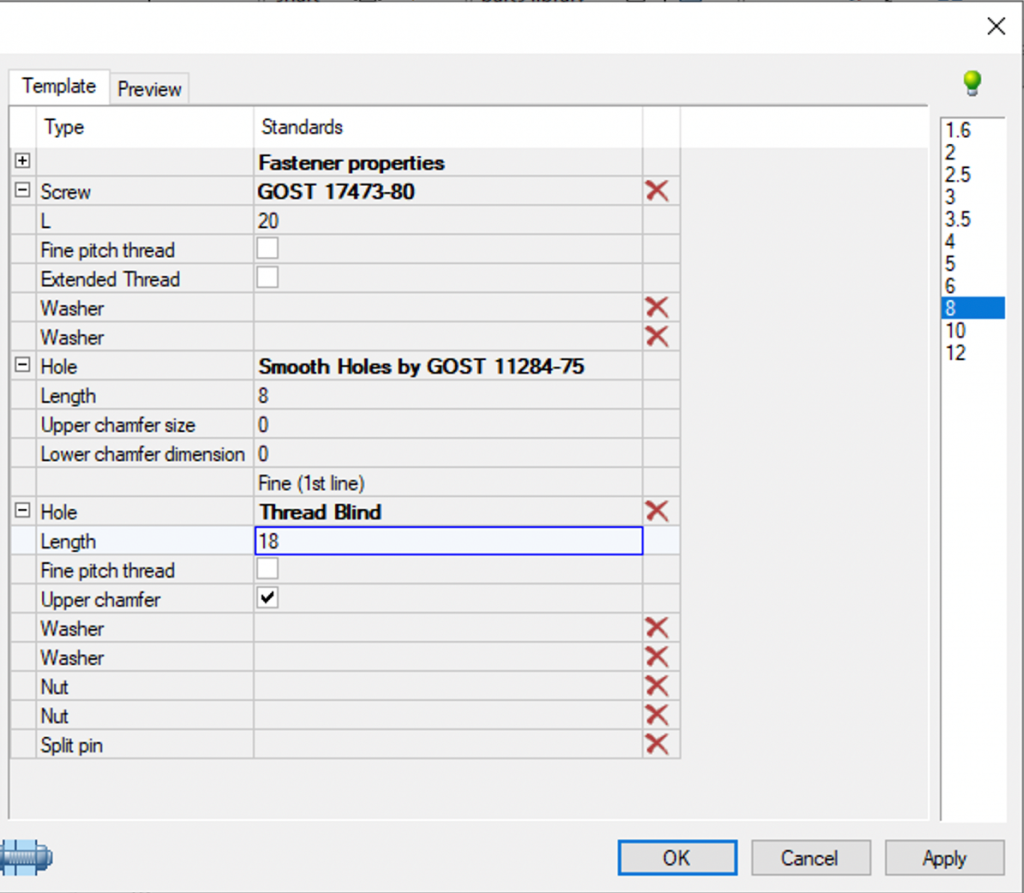
Fig. 67. Adjustment of connection package parameters
The final view of bolted and screwed connections is shown in Fig. 68.

Fig. 68. Final view of bolted and screw connections
Save the file to the Exercises folder.


 De
De  Es
Es  Fr
Fr  Pt
Pt 
