

-
-
-
-
-
-
-
-
-
-
-
Toolbars Tab
-
-
-
-
-
-
-
-
-
-
-
-
-
-
-
-
-
-
-
-
-
-
-
-
-
-
-
-
-
-
-
-
-
-
-
-
-
-
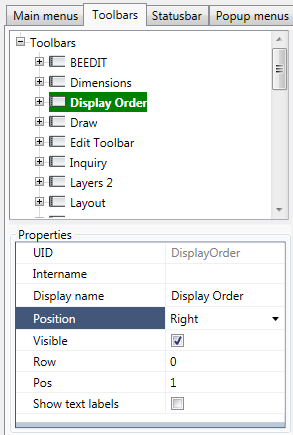
Toolbars Tab
Create custom toolbars and edit existing. It is possible to add commands, drop-down lists, controls and separators. Properties of selected toolbar are displayed in the Properties:
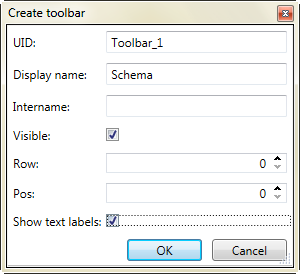
1. To open the Create toolbar context menu, select the upper line of the Toolbars tree list ( or click the right mouse button in the list window). If you select a certain toolbar and use the Add toolbar context menu command, a new toolbar will be located directly before the selected one
2. Fill fields in a Create toolbar dialog box.
3. Click OK.
Parameters
|
UID |
Element identifier. |
|
Display name |
Displayed name of toolbar. |
|
Position |
Position on the screen. |
|
Visible |
Turns on/off visibility of toolbar. |
|
Row |
Row for fixed toolbar. |
|
Pos |
Position in the row of fixed toolbar. |
|
Show text labels |
Turns on/off the display of text labels on buttons of the selected toolbar. |
Depending on the selected Show text labels mode, floating (located in graphic area) toolbars have different appearance:
|
The Show text labels box is clear |
The Show text labels box is checked |
|
|
|
Add an element into toolbar
1. Select toolbar in the list.
2. Call context menu and select one of items:
· Insert button
· Insert control
· Insert flyout
· Insert separator
3. Fill fields in dialog box.
Add button
1. Select Insert button command.
2. Set Display name in the Create toolbar button dialog box.
3. Click  button near Intername.
4. Select the desired command. Click OK.
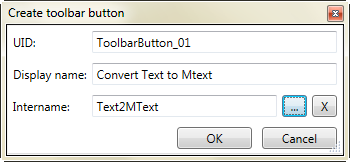
It is possible to drag and drop command to add button into toolbar.
Add control
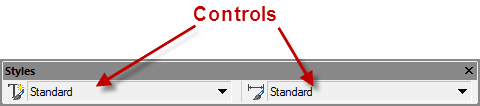
Drag and drop control from the list to add it into toolbar.
1. Select Insert control command.
2. Set Display name in the Create toolbar control dialog box.
3. Click the button near Control field.
4. Select the desired control in a Select control dialog box. Click OK.
Add drop-down toolbar
1. Select the Add toolbar command.
2. In the Create toolbar flyout dialog click the  button next to the Main command field.
3. Select the command in the Select command dialog. Click ОК.
4. Click the button next to the Additional command field.
5. Select the command in the Select command dialog. Click ОК.
The  button clears the field.