
 De
De  Es
Es  Fr
Fr  Pt
Pt 

-
-
-
-
-
-
-
-
-
-
-
-
-
-
-
-
-
-
-
-
-
-
-
-
-
-
-
-
-
-
-
-
-
-
-
-
-
-
Creating Contour Lines Labels
-
-
-
-
-
-
-
-
-
-
-
-
-
-
-
-
-
Creating Contour Lines Labels
 Ribbon: Topoplan – Relief >
  Contour Lines Labels
Menu: Ground – Elevation >  Contour Lines Labels
Toolbar: Elevation > Contour Lines Labels
 Command line: NG_CREATE_CONTOUR_LABEL
The command creates a label automatically or at the specified location of the contour.
The command parameters are set in the Properties bar.
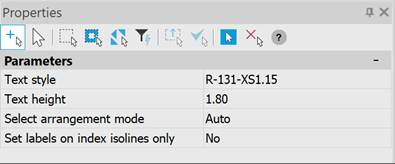
|
Text style |
Selecting the text style. |
|
Text height |
Specifying the text height. |
|
Select arrangement mode |
Auto – Labels are placed automatically. The cursor specifies points along the line intersecting the contours, and labels are placed along it. By hand – Labels are placed manually. The cursor specifies the position of the label in the specified place on the contour. If you specify Auto, an additional parameter appears: Set labels on index isolines only. |
|
Set labels on index isolines only |
With this parameter enabled, labels are placed only on index isolines. |
Contours must first be built and the scale of the topographic map selected.
To create labels for contour lines:
1. Run the command.
2. If 3D visual style was set in a drawing, then a warning message appear at the command launch with the proposal to switch to 2D render mode. Agree for the right display of label elements.
3. In response to the prompt
Specify position (s) of contour elevation label(s) and press Enter:

click on the contour line with enabled snap to create the Mtext object on the Contour lines layer with the enabled Hide background parameters to hide a contour area in the text insertion point.
It is not necessary to use an object snap: a label will be created on the contour line nearest to the cursor.
4. Several labels can be created in succession. Pressing ESC button ends the command.